1. What will you learn in this module?
The Accounts module in ERPNext is the backbone of your company’s financial system. Throughout this course, the NEXTFUTURE team will walk you through all key accounting transactions that any sound accounting system must support – and translate them into clear, repeatable steps inside ERPNext.
- Understand the Chart of Accounts and how to read/design an account structure that fits your business.
- Execute the full purchase cycle: from Purchase Request up to Purchase Invoice, Payment Entry, and supplier reconciliation.
- Execute the full sales cycle: from Quotation/Sales Order up to Sales Invoice, Payment Entry, and customer reconciliation.
- Record manual Journal Entries and accounting adjustments (provisions, depreciation, FX differences, etc.).
- Manage cash and bank transactions using Payment Entry for receipts and payments.
- Use the core reports: General Ledger, aging, account balances, and bank-related reports.
- Review and reconcile accounts on a regular basis and understand the impact of each document on the financial statements.
The content is written in a practical training style so that it can serve as a reference after the course, or as the foundation for internal training material inside your company.
2. Financial Document Flow in ERPNext – From Request to Entry
Before diving into individual screens, we need to see the big picture: how financial data moves through the system from the very first step to the final report. You can think of the Accounts module as a stream flowing through the following stages:
- Requests (Purchase Requests, Sales Orders).
- Stock movements (Goods Receipt / Delivery).
- Invoices (Purchase Invoices, Sales Invoices).
- Receipts & payments (Payment Entries).
- Reports & reconciliation (General Ledger, Statements, Bank Reconciliation, etc.).
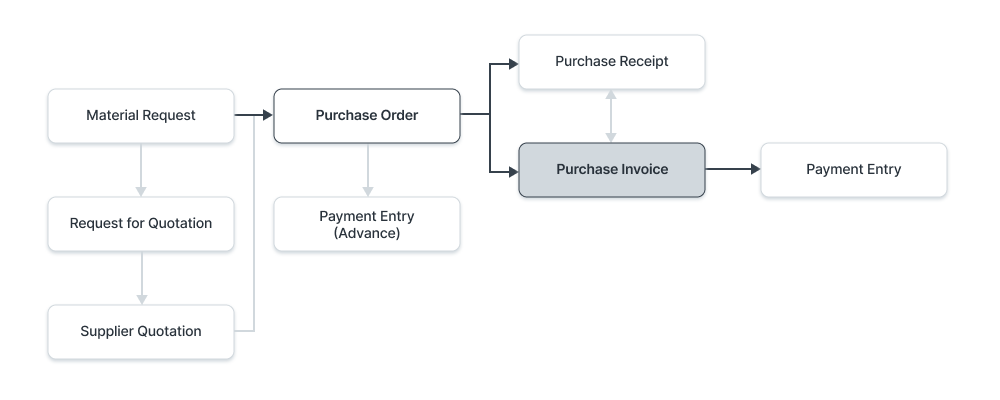
A very similar flow exists on the sales side: Quotation / Sales Order → Delivery Note → Sales Invoice → Payment Entry. At every stage, ERPNext creates the required accounting entries automatically, keeping balances in sync between Accounts and Stock.
3. Preparing the Accounting Environment Before Posting Transactions
One of the biggest mistakes in any ERP implementation is to start entering invoices and vouchers before making sure the accounting foundation is properly set up. In this section we define what needs to be configured together before day-to-day transactions begin.
3.1 Chart of Accounts
The Chart of Accounts (CoA) is the tree of main and sub-accounts on which all accounting entries are built. ERPNext ships with standard CoA templates (by country or industry), but NEXTFUTURE’s role is to:
- Review your current account structure.
- Propose a simplified, reporting-friendly structure where needed, while respecting legal requirements.
- Map each document type to the right accounts (sales, inventory, cost of goods sold, expenses, etc.).
3.2 Party master data (Customers, Suppliers, Employees)
Before using purchase and sales invoices, we prepare all key party masters:
- Create Customers and link each one to the right receivable account (local, export, etc.).
- Create Suppliers and link each one to the appropriate payable account.
- Define bank and cash accounts inside the Chart of Accounts and map them for use in Payment Entries.
- Set up some employees when you need staff advances or employee receivable/payable accounts.
3.3 General accounting settings
In the initial setup session we will review the most important settings under Accounts Settings and Company, such as:
- Base company currency (e.g. JOD) and default invoice currency.
- Fiscal year configuration and number of periods (annual, quarterly, etc.).
- Default accounts for taxes, discounts, interest, exchange differences, and so on.
- Enabling Multi Currency when the company works with multiple currencies.
4. Purchase Cycle – From Purchase Request to Payment Entry
In this unit, trainees learn how stock or service requirements are converted into fully posted financial documents, and how ERPNext generates the related accounting entries at each step.
4.1 Purchase cycle steps
- Create a Material Request or a direct Purchase Order, depending on your policy.
- Physically receive the items and record them via Purchase Receipt (optional, based on policy).
- Receive the supplier invoice and record it as a Purchase Invoice.
- Settle the invoice using a Payment Entry in cash, cheque, or bank transfer.
4.2 Purchase Invoice
The Purchase Invoice is the key document linking the supplier, inventory and expenses. Once saved and submitted, ERPNext automatically updates supplier balances, inventory, and cost accounts.
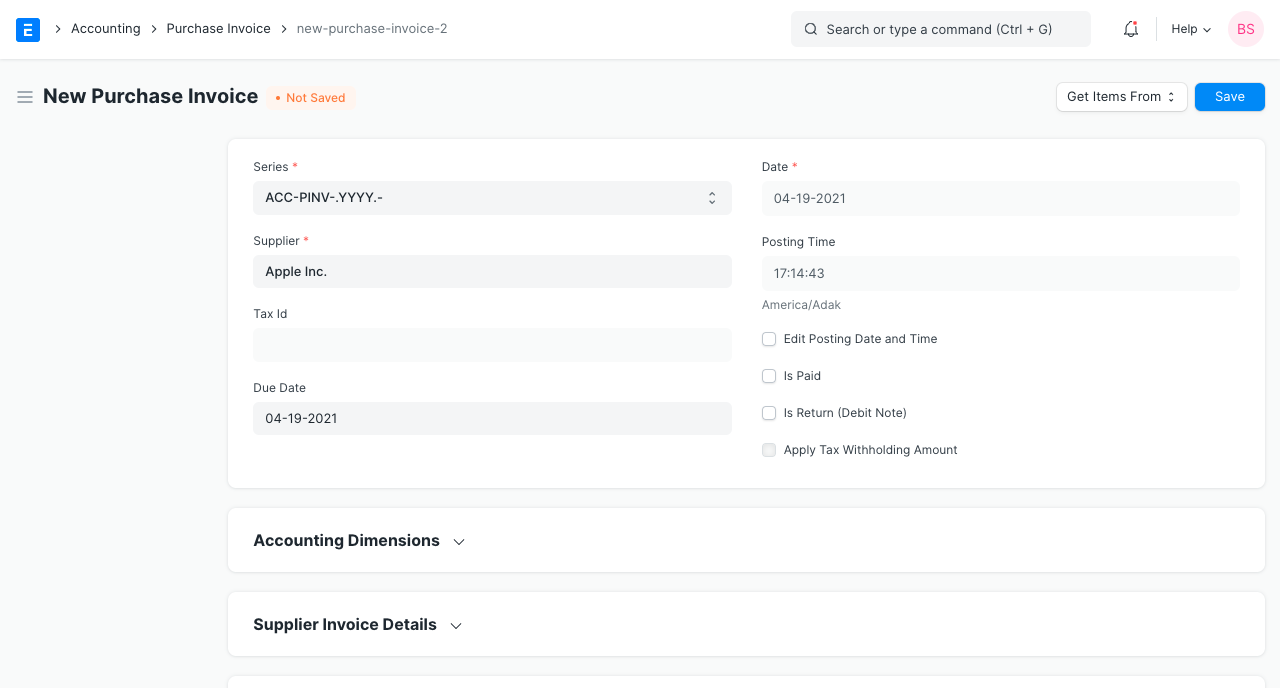
4.2.1 Creating a Purchase Invoice – Step by step
- From the module tree, go to Accounting > Accounts Payable > Purchase Invoice.
- Click New to create a new invoice.
- Select the Supplier and make sure address and tax details are fetched correctly.
- Set the Posting Date and Due Date, where applicable.
-
In the Items table, add items or services:
- Select each item from the Item master.
- Enter quantity and rate.
- Select the warehouse into which the items will be received.
- Add taxes and charges in the Taxes and Charges table based on your tax setup.
- Review totals and check all amounts carefully.
- Click Save then Submit to post the invoice and create the GL entry.
Objective: Post a first local supplier invoice with VAT and review its effect on the supplier balance and inventory.
- Supplier: Stationery supplier.
- Item: A4 printer paper – 10 boxes.
- Unit rate: 3 JOD, VAT: 16%, payment terms: credit.
- After submitting, open the General Ledger to view the automatically generated entry.
4.3 Linking receipts to invoices
In companies that follow a “receive first, invoice later” policy, you first create a Purchase Receipt, then generate the Purchase Invoice from that receipt.
- This ensures that billed quantities match what was actually received.
- It reduces the risk of errors in quantities or prices.
- It allows you to record obligations to suppliers even before the physical invoice is issued.
4.4 Payment Entry for Purchase Invoices
Once a Purchase Invoice is submitted, the company owes money to the supplier. When paying, you create a Payment Entry of type Pay and link it to the invoice, which updates the supplier balance and marks the invoice as paid.
5. Sales Cycle – From Sales Order to Customer Receipt
The sales side is the heart of your revenue. In ERPNext, the sales cycle mirrors the purchase cycle, but from the customer’s perspective. Here we will work with documents such as Sales Order, Delivery Note, Sales Invoice, and receipts.
5.1 Sales cycle steps
- Create a Quotation if required, or directly a Sales Order.
- Convert the order into a Delivery Note to confirm goods have been delivered.
- Create a Sales Invoice linked to the order or delivery note.
- Record the received amount via a Payment Entry of type Receive.
5.2 Sales Invoice
Unlike a Purchase Invoice, a Sales Invoice represents a receivable from the customer and revenue for the company. When it is submitted, ERPNext updates Accounts Receivable, Sales, and Inventory accounts.
5.2.1 Creating a Sales Invoice – Step by step
- Go to Accounting > Accounts Receivable > Sales Invoice.
- Click New and choose the Customer to bill.
- Set the Posting Date and Due Date.
-
In the Items table, add the required items or services:
- Select items and quantities.
- Set selling prices and choose the relevant Price List (if applicable).
- Choose the warehouse from which goods will be delivered (if the invoice moves stock).
- Apply taxes and discounts according to your sales policy.
- Review the grand total, then Save and Submit.
- Customer: Local retail shop.
- Item: Display screen – 5 units at 120 JOD each.
- Overall discount: 5% on the invoice, VAT: 16%.
- Payment terms: 30 days, so the invoice remains Unpaid after posting.
- After submission, open the Customer Ledger to see the new customer balance.
5.3 Customer receipts (Payment Entry – Receive)
When a customer pays part or all of the outstanding amount, you create a Payment Entry of type Receive and link it to the invoice. Payment can be in cash, cheque, bank transfer, or through a payment gateway.
During the training, we will distinguish between:
- A receipt linked to a specific invoice (direct settlement of that invoice).
- An Advance receipt recorded before the invoice, and then applied later.
- A general receipt to an account without linking to invoices, and how that appears in reports.
6. Journal Entries & Accounting Adjustments in ERPNext
Although most entries are created automatically from invoices and Payment Entries, there is always a need for manual Journal Entries to handle special adjustments such as provisions, interest, foreign currency differences, and year-end closing entries.
6.1 When do we use a Journal Entry?
- To post opening balances when starting on ERPNext.
- To recognise provisions (e.g. doubtful debts, bonuses, etc.).
- To correct errors in previous entries using proper accounting treatment.
- To record accrued expenses or revenues not yet invoiced.
- To record asset depreciation if the automated Fixed Assets module is not used.
6.2 Key fields in a Journal Entry
- Posting Date – date on which the entry affects the books.
- Reference Number / Date – external reference (cheque, paper voucher, etc.).
- Accounts table – all debit and credit lines.
- User Remark – short description used later for investigation and reporting.
6.3 Example – Provision for doubtful debts
Assume the company decides to create a provision of 5% on a specific customer balance:
- Debit: Expense account for provision for doubtful debts.
- Credit: Provision for doubtful debts account (liability or contra-asset account).
- Open Journal Entry from the Accounts module.
- Choose entry type as a normal Journal Entry.
- Enter the expense account as Debit and the provision account as Credit with the provision amount.
- Write a clear User Remark, e.g. “Provision for customer X at 5%”.
- Save and submit, then review the effect in the Trial Balance.
6.4 FX differences & revaluation
For companies dealing in multiple currencies, you will use special entries to record FX differences at settlement or at period end. In the training we will discuss:
- The difference between realised Exchange Gain or Loss on actual payment and Exchange Rate Revaluation at period end.
- How FX differences appear in the Income Statement.
- Best practices to minimise the number of manual entries by leveraging ERPNext settings.
7. Cash Management – Receipts & Payments (Payment Entry)
The Payment Entry document is the link between invoices and cash/bank accounts. It is the primary tool used to settle invoices and close open receivables and payables.
7.1 Payment Entry types
- Receive – money received from a customer or other party.
- Pay – money paid to a supplier or other party.
- Internal Transfer – transfers between internal accounts (e.g. from cash to bank).
7.2 Key fields in Payment Entry
- Party Type and Party (Customer, Supplier, Employee, etc.).
- Paid From account (for Pay entries) or Paid To (for Receive entries).
- Currency, amount, and exchange rate if account currency differs from invoice currency.
- The References table that links the payment to open invoices.
7.3 Training scenarios for Payment Entry
- Entry type: Pay.
- Party Type = Supplier; select the supplier.
- Paid From = bank account, Paid To = payable/party account.
- Use the References table to pull open invoices and select a full payment.
- Submit, then review the supplier’s balance in the Supplier Ledger.
- Entry type: Receive.
- Select the customer and the receiving account (cash box or bank).
- Choose the invoice in the References table and enter an amount lower than the outstanding.
- After submission, the invoice remains Partly Paid with an open balance.
- Create a receipt/payment without linking it to any invoice.
- The amount is recorded as an advance balance for the customer or supplier.
- When an invoice is created later, this advance can be applied as part of the payment.
7.4 Internal transfers & cash management
Companies frequently transfer amounts between internal accounts (bank to bank, bank to cash, or vice versa). Instead of a manual Journal Entry, you can use Payment Entry – Internal Transfer:
- Paid From = source account.
- Paid To = destination account.
- No invoices are linked, but the movement appears in the General Ledger for both accounts.
8. Core Reports & Account Reconciliation
The real power of the Accounts module in ERPNext lies not only in recording transactions, but in the ability to read them through clear, flexible reports. In this module we focus on a set of core reports:
8.1 General Ledger
The General Ledger report shows all entries posted to a specific account or group of accounts over a given period, with filters for document type and party.

Using this report, the accountant can:
- Trace all movements affecting a specific account (e.g. a sales account, a given bank account, a customer account).
- Verify that account balances match the figures in the final financial statements.
- Filter by date range, reference type, account, customer/supplier and more.
8.2 Ordering of entries in the GL
The report allows you to choose how entries are ordered in time: from newest to oldest, or the opposite. When you select Ascending Order, entries are shown from oldest to newest, which makes it easier to review the chronological sequence of movements.

8.3 Receivables and payables reports
- Accounts Receivable: shows open customer invoices, usually grouped by aging buckets (0–30 days, 60, 90, etc.).
- Accounts Payable: shows the company’s obligations to suppliers in a similar way.
- These reports support decisions on collection actions and payment scheduling.
8.4 Bank reconciliation
To correctly close the accounting cycle, you should:
- Import bank statements (or enter them manually).
- Match bank movements with Payment Entries in ERPNext.
- Handle differences (bank fees, interest, unrecorded transactions) through adjustment entries.
9. Training Sessions Plan for the Accounts Module
To turn this content from text into practical skills, the work will be distributed across several training sessions. The following model illustrates the typical plan used by NEXTFUTURE in most projects:
Session 1 – Basic setup & Chart of Accounts
- Review the company’s existing Chart of Accounts.
- Configure Company, Fiscal Year, currencies, and tax settings.
- Enter sample customers, suppliers, and bank accounts.
- Create a first simple Journal Entry to confirm postings are correct.
Session 2 – Full purchase cycle
- Create a new item and link it to stock and accounts.
- Execute the scenario Purchase Order → Purchase Receipt → Purchase Invoice → Payment Entry.
- Review the effect of each step in the General Ledger.
Session 3 – Full sales cycle
- Create a new customer with specific pricing/discount policies.
- Execute the scenario Sales Order → Delivery Note → Sales Invoice → Payment Entry.
- Handle a sales return (Credit Note) and review its impact on stock and receivables.
Session 4 – Adjustments, special entries & reports
- Post provisions, depreciation, and FX differences using Journal Entry.
- Review the main reports and perform account reconciliation.
- Build a monthly “closing checklist” for your Accounts team to use after training.
10. How NEXTFUTURE Supports You After Training
NEXTFUTURE’s role does not end with the last training session. Our goal is to enable your team to run the system confidently. Therefore, we usually commit to the following:
- Document all examples and scenarios used during training in a shareable electronic guide.
- Schedule a Q&A follow-up session around one month after go-live to address real-life questions.
- Suggest practical KPIs for the Accounts team (closing speed, percentage of unreconciled invoices, etc.).
- Provide additional consulting where needed to enhance reports or automate more accounting processes.
Every screen and every report you will see in this module is built on sound accounting logic. The more you understand the relationship between the document, the GL entry, and the report, the more ERPNext becomes a decision-making tool – not just a data entry program.
11. Opening balances and opening entries in ERPNext
When moving from a legacy system or spreadsheets to ERPNext, the team should not start by entering new invoices only. The opening financial position must first be transferred in a controlled way: customers, suppliers, banks, cash, assets, inventory, liabilities, and equity.
11.1 Suggested training flow
- Collect the final approved trial balance from the legacy system.
- Separate open customer and supplier balances from general ledger balances.
- Choose the ERPNext opening date.
- Post opening balances for balance sheet accounts.
- Import open customer and supplier invoices when follow-up is required.
- Compare ERPNext Trial Balance with the approved legacy balance.
Official ERPNext reference: Opening Balance in Accounts and Opening Invoice Creation Tool.
12. Fiscal year, accounting period, and closing
ERPNext accounting should not remain open without controls. Fiscal years and accounting periods define when transactions can be posted and when a period should be protected after reporting.
12.1 Accounting Period
Accounting Period can restrict selected submittable transactions outside the defined period, such as Sales Invoice, Purchase Invoice, Stock Entry, Payroll Entry, and Journal Entry.
12.2 Period Closing Voucher
After reviewing adjustments, ERPNext can close income and expense accounts and transfer profit or loss to the selected closing account.
Official ERPNext reference: Fiscal Year, Accounting Period, and Period Closing Voucher.
13. Cost Centers and Accounting Dimensions
The account explains the nature of the transaction. Cost Centers and Accounting Dimensions explain where it happened: branch, department, project, activity, territory, or channel.
13.1 Best practice
- Do not replace accounts with cost centers.
- Do not create unnecessary account branches when a dimension can solve the reporting need.
- Use dimensions to read profitability without bloating the Chart of Accounts.
Official ERPNext reference: Cost Center and Accounting Dimensions.
14. Payment Terms and credit control
Payment Terms in ERPNext can generate a payment schedule inside sales and purchase documents. This makes due dates, installments, and receivables aging clearer.
14.1 Practical example
A 30/70 template can request 30% upfront and 70% after 45 days. When used in a Sales Invoice, ERPNext builds the payment schedule accordingly.
Official ERPNext reference: Payment Terms and Payment Terms Template.
15. Payment Reconciliation and UnReconcile
A payment may be recorded but still not allocated to the correct invoice. Payment Reconciliation helps fetch unlinked invoices and payment transactions for a customer or supplier and allocate them properly.
15.1 When to use it
- Unallocated payments exist.
- Advance payments need to be linked to later invoices.
- Credit notes or journal entries need allocation.
- A customer or supplier statement shows unexplained open amounts.
15.2 UnReconcile
If a payment was reconciled with the wrong invoice, UnReconcile can remove the allocation without canceling the underlying voucher.
Official ERPNext reference: Payment Reconciliation, Payment Ledger, and UnReconcile.
16. Bank Reconciliation in ERPNext
Bank reconciliation compares bank statement movements with ERPNext vouchers and journal entries. The objective is to ensure that every bank movement has a clear system record.
16.1 Typical differences
- Bank charges not yet posted.
- Payments recorded in ERPNext but not cleared in the bank.
- Bank receipts not yet entered as Payment Entries.
- Duplicate or wrong-bank postings.
Official ERPNext reference: Bank Transaction and Bank Reconciliation.
17. Process Statement of Accounts
Customer statements should be part of a recurring receivables follow-up process, not only a report requested at year-end. They help confirm balances, reduce disputes, and identify unallocated payments early.
Official ERPNext reference: Process Statement of Accounts and Accounts Receivable.
18. Immutable Ledger and correction discipline
Once financial documents are submitted, corrections should remain traceable. The training rule is simple: cancel, reverse, or adjust clearly instead of silently changing financial history.
18.1 Training rules
- Do not edit submitted financial documents casually.
- Cancel only when the document is fundamentally wrong and the period allows it.
- Use correction entries when the original financial history should remain visible.
- Always document the reason in remarks.
Official ERPNext reference: Immutable Ledger and Accounting Entries.
Course summary for search and AI discovery
A practical accounting course connecting ERPNext financial documents, accounting entries, receivables, payables, reconciliation, cost centers, and financial closing.
Topics and keywords
- ERPNext Accounting
- ERPNext accounting course
- Payment Entry ERPNext
- Payment Reconciliation ERPNext
- Bank Reconciliation ERPNext
- Chart of Accounts ERPNext
- Cost Center ERPNext
- ERPNext Jordan
- NextFuture ERPNext Training