1. Introduction to the Manufacturing Module in ERPNext
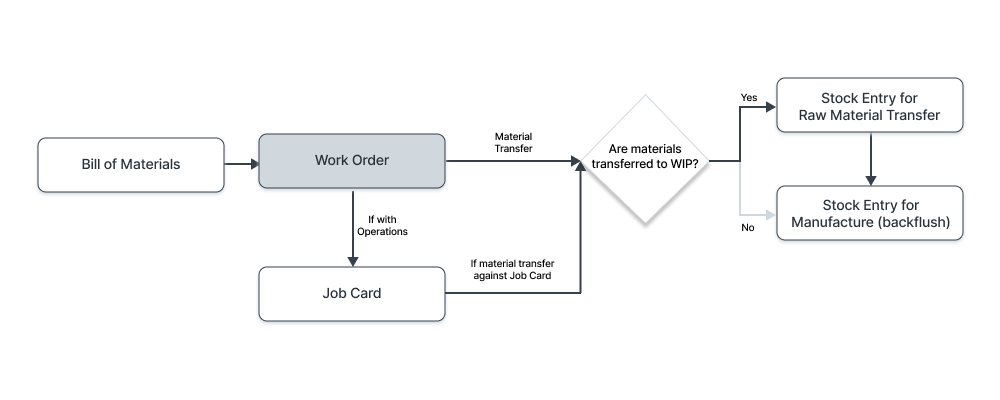
The Manufacturing module in ERPNext connects raw materials, the production line, and the finished product in an integrated way. The goal of this course is to help trainees understand the full sequence – from defining the item until posting the finished batch to stock with a clear cost and traceable batch number.
- Define raw materials and finished goods with UOM, barcode, Batch, and product image.
- Build a detailed Bill of Materials (BOM) and link it to operations and Workstations.
- Configure Production Plan and Work Orders based on Sales demand.
- Manage Job Cards and track time and cost per operation.
- Execute manufacturing stock movements: Transfer to WIP, Manufacture, and Scrap.
- Handle scrap and wastage correctly and control their impact on cost and stock.
- Use key manufacturing reports to monitor capacity and production cost.
2. Preparing Items for Manufacturing: Item, UOM, Barcode, Batch
Before you start creating Work Orders, items must be defined correctly. In ERPNext, every material is an Item which can be a raw material, semi-finished, or finished product.
2.1 Accessing the Item screen
From the module tree: Home > Stock > Items or via Global Search by typing Item.

2.2 Key item fields for manufacturing
- Item Code / Item Name: How the item will appear on all documents.
- Item Group: Category (Raw Materials, Packing Materials, Finished Goods, etc.).
- Default Unit of Measure (UOM): Main unit for the item (KG, PCS, LTR, etc.).
- Maintain Stock: Enable this for items that should appear in inventory.
- Include Item in Manufacturing: Mark if the item is used in, or produced by, manufacturing.
2.3 Defining UOMs and conversions
In real life, materials might be received in one unit and consumed in another (e.g., Carton → Bag → KG). ERPNext lets you define multiple UOMs and conversion factors.
- Go to Home > Stock > Setup > UOM.
- Define UOMs such as KG, Bag, and Carton.
- In the Item, open the UOMs table and set conversion factors (e.g. 1 Carton = 10 KG).
2.4 Barcode and Batch / Serial
- In the Barcode section, you can add one or more barcodes for scanner use.
- In the Inventory section, enable:
- Has Batch No: For items managed by batches (powders, blends, food production, etc.).
- Has Serial No: For items managed by serial numbers (electronics, machines, etc.).
- You can link a Batch Date and Expiry Date if the item has a shelf life.
2.5 Adding a product image
In the Item form, use the Image field to upload a picture from your device or existing files. This image will appear in reports and Job Cards to help operators visually identify the item.
3. Defining Workstations, Operations, and Routing
Before building a complete BOM, you should define the Operations the product goes through and the Workstations where these operations are executed.
3.1 Defining Workstations
Navigation: Home > Manufacturing > Bill of Materials > Workstation
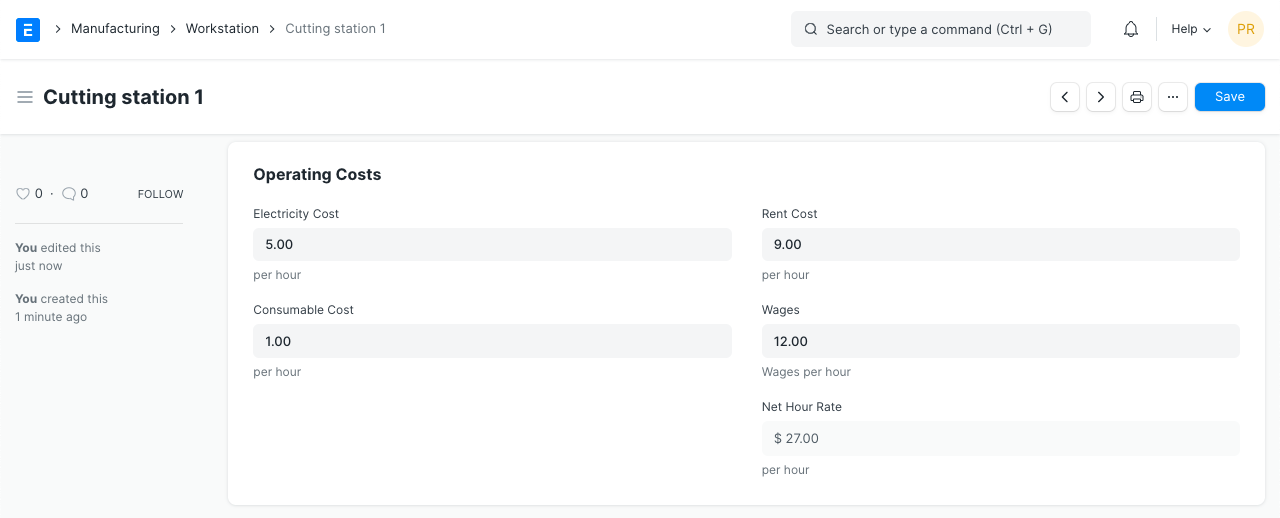
- Workstation Name: Name of the line or machine (Mixer-1, Oven-2, etc.).
- Operating Costs: Estimated costs (power, rent, labor, auxiliaries, etc.).
- Holiday List: Used to exclude holidays from capacity calculations.
3.2 Defining Operations
An Operation is a step like “Mixing”, “Filling”, “Baking”, or “Welding”. Navigation: Home > Manufacturing > Bill of Materials > Operation
- Set the operation name (e.g., Mixing, Filling, Packing).
- Define standard time per unit (Operation Time) if applicable.
- Later, link each operation to one or more Workstations in BOM or Routing.
3.3 Routing (optional but very useful)
Routing defines the ordered sequence of Operations for a product. You can have one routing per product type.
- Go to Home > Manufacturing > Bill of Materials > Routing.
- Create a new Routing and add Operations in sequence, each linked to its Workstation.
- Use this Routing in the BOM instead of manually entering operations inside the BOM.
4. Defining the Bill of Materials (BOM)
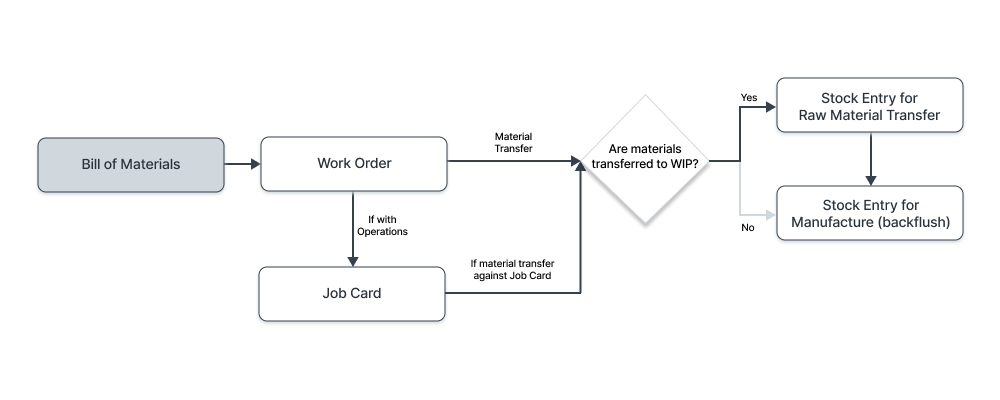
The Bill of Materials (BOM) is the heart of the Manufacturing module. It defines the materials and operations required to produce a specific quantity of the finished product.
4.1 Creating a new BOM
- Go to Home > Manufacturing > Bill of Materials > Bill of Materials.
- Click New and select the finished Item (e.g., Chocolate Cake 1kg).
- Set the standard Quantity (e.g. 1 KG or 100 PCS).
- In the Items table, add raw materials and quantities per produced unit.
- If you use Routing, select it in Routing or add operations directly in the Operations table.
4.2 Important fields in BOM
- Is Active: Enable or disable the BOM.
- Is Default: Set as the default BOM for this item in Work Orders.
- With Operations: Activate link between BOM and Job Cards / Operations.
- Scrap Items: Define scrap materials and expected scrap percentages.
4.3 Costing from BOM
When you save and submit a BOM, ERPNext calculates the expected manufacturing cost based on:
- Material costs (from stock valuation).
- Operation costs linked to Workstations.
- Any defined scrap rates.
5. Planning Production with Production Plan
A Production Plan aggregates production requirements from multiple sources (Sales Orders, Material Requests, or manual estimates) and converts them into Work Orders.
5.1 Creating a new Production Plan
- Go to Home > Manufacturing > Production > Production Plan.
- Create a new plan and choose the source:
- Get Items From = Sales Order to pull items from approved sales.
- Get Items From = Material Request if manufacturing requests come from other departments.
- Adjust quantities and Required By Date per item.
5.2 Material requirements and Work Orders
From inside a Production Plan, you can:
- Run Get Material Requirements to calculate raw material needs based on BOM.
- Create Material Requests for purchasing or internal transfers.
- Create Work Orders for each finished item.
6. Work Orders in ERPNext
A Work Order is the document that flows from planning to the shop floor. It defines the product to be manufactured, its quantity, production location, required materials, and operations.
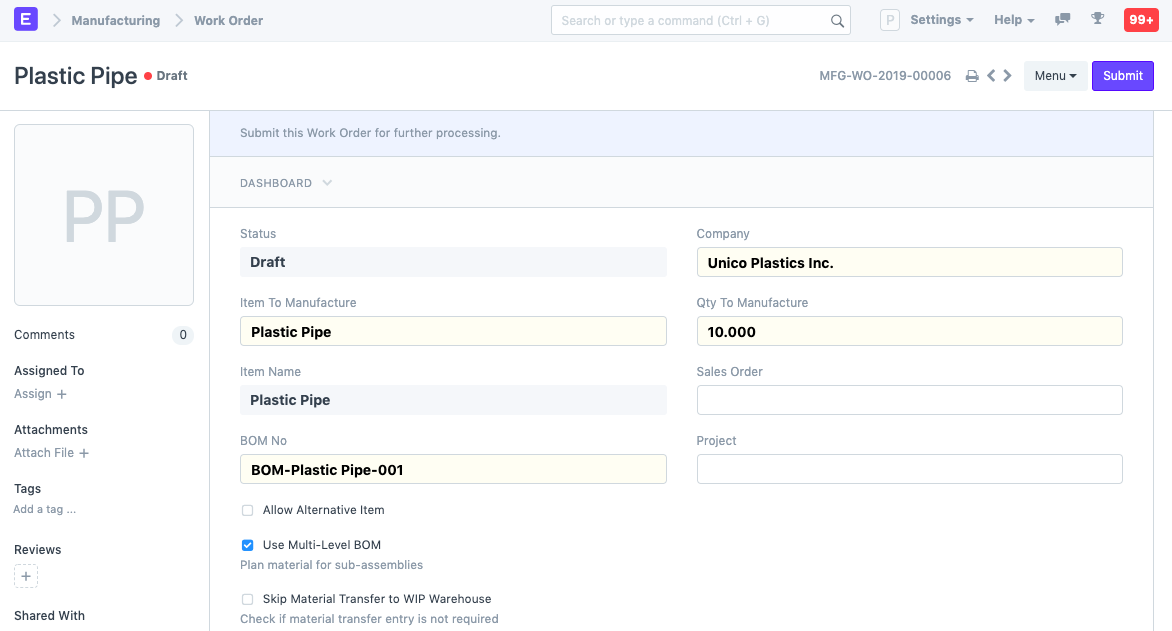
6.1 Creating a Work Order
- Go to Home > Manufacturing > Production > Work Order.
- Click New and:
- Choose Item to Manufacture.
- Ensure the correct Default BOM is selected.
- Enter Quantity to Manufacture.
- Set Source Warehouse (raw materials), WIP Warehouse, and Target Warehouse (finished goods).
- Save and Submit the Work Order to start the production cycle.
6.2 Material transfer options
- Transfer Material Against = Work Order: Transfer all required materials at once to WIP.
- Transfer Material Against = Job Card: Transfer materials per operation / Job Card.
For small implementations, you may move materials directly from the raw materials warehouse to the finished goods warehouse using Backflush. In larger plants, it is recommended to use a dedicated WIP warehouse and track materials per operation.
7. Job Cards – Tracking operations on the shop floor
A Job Card stores the actual details of each operation on a specific Workstation: runtime, operators, produced quantity, and scrap.
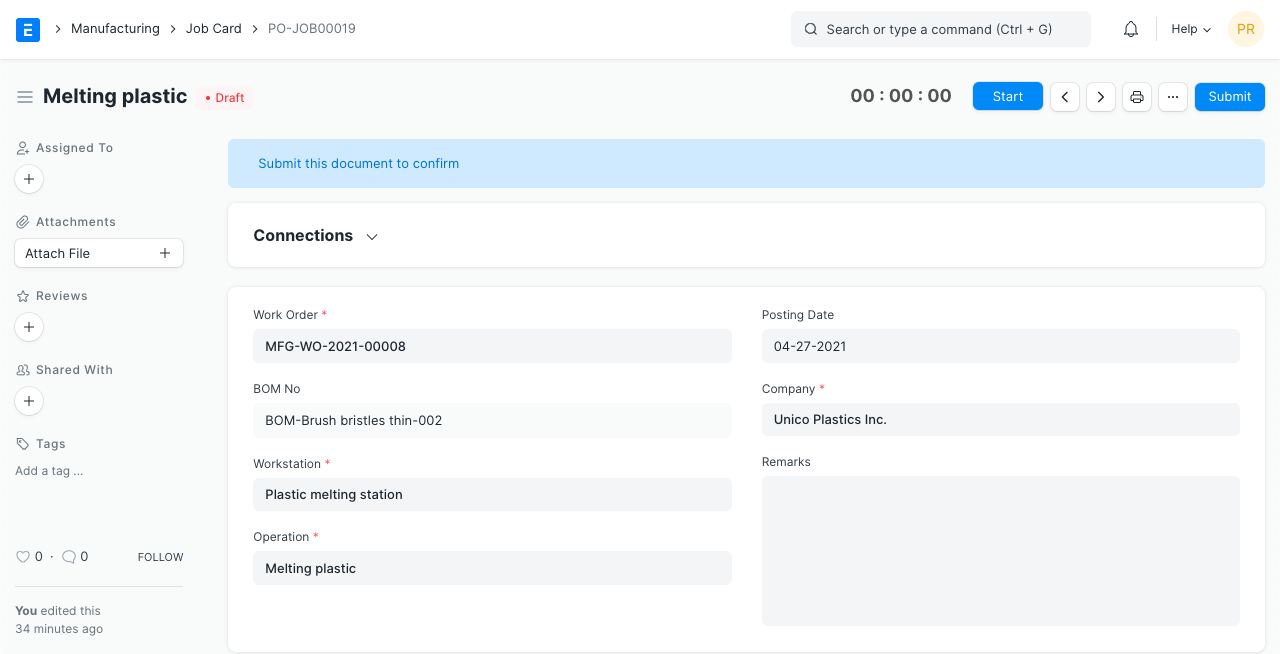
7.1 Creating Job Cards from a Work Order
When you submit a Work Order that has operations (from BOM or Routing), ERPNext can automatically create Job Cards for each operation.
- Open a submitted Work Order.
- From the action menu choose Create > Job Cards (if not already created).
- A Job Card is generated for every Operation with its Workstation and planned quantity.
7.2 Using Job Cards on the shop floor
- The operator opens the Job Card and clicks Start Job when the operation begins.
- When finished, they click Complete Job and enter:
- Completed quantity.
- Any rejected or scrap quantity.
- Actual runtime (if not captured automatically).
- The Work Order is automatically updated with progress against each operation.
- Choose a Work Order for a finished product (e.g., Cake Mix 1000 KG).
- Open the Job Card for the Mixing operation on the relevant Workstation.
- Start the job, then complete it with actual quantities and time.
- Review the Work Order and confirm that progress has been updated.
8. Stock Movements in the Manufacturing Cycle (Stock Entry)
During manufacturing, the Stock Entry document is used to transfer raw materials, post finished goods, and handle scrap and WIP movements.
8.1 Main Stock Entry types for manufacturing
- Material Transfer: Move materials from raw materials warehouse to WIP or between warehouses.
- Manufacture: Consume raw materials and post finished goods (with batch) based on a Work Order.
- Material Transfer for Manufacture: Prepare materials for production and manufacture later.
- Material Receipt / Issue: Receive or issue materials outside Work Orders (use with care).
- Repack: Change packaging without changing the item itself (e.g., from bag to carton).
8.2 Creating a Manufacture Stock Entry from a Work Order
- Open a Work Order in In Progress state.
- From Create, choose Stock Entry.
- Set Purpose = Manufacture.
- ERPNext will automatically:
- List raw materials in the Items table with required quantities.
- Add the finished item as the last row with the Target Warehouse.
- If the item is batch-managed, select or create a new Batch for the finished goods.
- Save and submit the Stock Entry to update inventory and manufacturing accounting.
8.3 Moving materials to WIP
In plants that use a dedicated WIP warehouse, you typically:
- Create a Material Transfer Stock Entry from raw materials warehouse to WIP.
- Then create a Manufacture Stock Entry consuming from WIP and posting finished goods.
9. Handling Scrap, Wastage, and Quality
There is no production without scrap. The key is to record scrap correctly so that materials do not “disappear” without a proper accounting impact.
9.1 Defining Scrap in the BOM
- In the Scrap Items table of the BOM, you can define:
- Which item is considered scrap (metal offcuts, packing leftovers, etc.).
- The expected scrap percentage for the production quantity.
- You may link a separate Scrap Warehouse to accumulate scrap items.
9.2 Recording actual scrap in Job Card or Stock Entry
When completing a Job Card, you can enter rejected quantity or scrap. Also, in a Manufacture Stock Entry, you can adjust quantities to reflect the difference between expected and actual consumption or output.
9.3 Handling non-production damage or loss
- Use Stock Entry > Purpose = Material Issue to write off damaged stock.
- Or use Stock Reconciliation after a physical count.
- These entries should be reviewed by accounting since they affect COGS and stock valuation.
10. Key Reports and Training Session Plan
10.1 Core manufacturing reports
- Open Work Orders: Follow up all open Work Orders and their status.
- Production Analytics: Analyze production quantities by item or period.
- BOM Explosion: Show all materials involved in a product across multi-level BOMs.
- Capacity Utilization: Monitor Workstation usage and runtime.
- Job Card Summary: Track time and cost per operation.
10.2 Suggested practical training plan
You can split the manufacturing training into four main hands-on sessions:
- Session 1: Items, UOMs, Item Groups, Batch / Barcode.
- Session 2: Workstations, Operations, BOM, Routing and product costing.
- Session 3: Production Plan, Work Orders, Job Cards, and Stock Entries.
- Session 4: Scrap & Quality, analysis reports, and integration with Accounting.
Every step in the Manufacturing module – from Item definition to reports – is connected to other modules. The more you understand the relationships between BOM, Work Order, and Stock Entry, the more ERPNext becomes a real factory management tool, not just a data entry system.
11. BOM as the material and costing base
A Bill of Materials is not only a list of materials. It defines the relationship between the finished good, raw materials, quantities, and operations required to manufacture it.
- Raw materials and sub-assemblies.
- Quantities per finished unit.
- Operations and workstations when applicable.
- Scrap or process loss when relevant.
- Estimated material and operation cost.
Official ERPNext reference: Bill of Materials.
12. Production Plan
Production Plan converts demand or forecasts into production planning and can create Work Orders for production items and Material Requests for raw materials.
Official ERPNext reference: Production Plan.
13. Work Order as the formal production signal
A Work Order signals the shop floor to manufacture a defined quantity of an item and helps generate material requirements from the BOM.
- Finished item and quantity.
- Approved BOM.
- Raw material, WIP, and finished goods warehouses.
- Planned dates and material transfer method.
Official ERPNext reference: Work Order.
14. Job Card and shop floor operations
Job Card helps track each operation, consumed time, workstation, employee or team, and operational status.
Official ERPNext reference: Job Card and Job Card Summary.
15. Stock Entry in manufacturing
Manufacturing relies on clear stock movements: moving materials to WIP, consuming materials, and receiving finished goods.
- Material Transfer for Manufacture.
- Manufacture.
- Material Issue when required.
Official ERPNext reference: Stock Entry and Work Order.
16. Scrap and quality control
Scrap, process loss, and rework should be visible and reviewable instead of being hidden inside unexplained cost differences.
Official ERPNext reference: Operation and Quality Inspection in manufacturing workflows.
17. Manufacturing costing and accounting impact
Manufacturing cost may include materials, operations, workstation time, scrap, WIP, and additional costs. BOM, Work Order, and Stock Entries should be reviewed together to understand product cost.
Official ERPNext reference: Manufacturing Settings, BOM, and Work Order.
18. Manufacturing reports for control
- Work Order Summary.
- Job Card Summary.
- BOM Stock Report.
- Stock Ledger for raw materials and finished goods.
- Manufacturing variance and product cost reports.
Course summary for search and AI discovery
A practical ERPNext manufacturing course connecting BOM, production planning, work orders, operations, job cards, WIP, scrap, stock entries, costing, and reports.
Topics and keywords
- ERPNext Manufacturing
- ERPNext Manufacturing Costing
- BOM ERPNext
- Work Order ERPNext
- Production Plan ERPNext
- Job Card ERPNext
- Workstation ERPNext
- Manufacturing Costing ERPNext
- NextFuture ERPNext Training