1. HR foundation setup
Company1) Company – الشركة
ما هي؟ الكيان القانوني. في بيئة متعددة الشركات تُسجَّل كل شركة مستقلة بتقاريرها ورواتبها وإجازاتها.
أين تُستخدم؟
- مطلوبة في بطاقة Employee.
- تربط Holiday List وLeave Period.
- أساس إعدادات الرواتب والعملة.
خطوات التعريف
- بحث: Company → New.
- املأ: Company Name، Abbreviation، Default Currency، Default Holiday List.
- Save.
2) Branch – الفرع
ما هو؟ موقع/فرع فعلي (عمّان، جدة، مصنع سحاب...).
الاستخدام
- فلترة حضور/إجازات/رواتب بالفرع.
- صلاحيات رؤية بالـ User Permission.
- قد تختلف الهياكل/التكاليف بين الفروع.
الخطوات
- HR → Branch → New.
- الاسم + ربط Company، ثم حفظ.
3) Department – القسم
ما هو؟ وحدة تنظيمية داخل الشركة (مثل المحاسبة، المبيعات، الإنتاج) تدعم بنية أب/ابن لبناء هيكل هرمي.
أين يُستخدم؟
- فلترة الحضور والإجازات والرواتب والتقارير حسب القسم.
- تحديد الصلاحيات والمديرين (Reports To) ومسارات الموافقات.
- الربط مع Cost Center أو Project (حسب السياسة المحاسبية).
الحقول المهمة
- Department Name – اسم القسم.
- Parent Department – القسم الأعلى لعمل شجرة الأقسام.
- Company – مطلوبة في البيئات متعددة الشركات.
- Department Lead – قائد/مدير القسم (مفيد لمسارات الاعتماد).
الخطوات
- من HR → Department اضغط New.
- أدخل الاسم، اختر Parent إن لزم، واربط Company.
- حدد Department Lead (اختياري لكن مفيد للموافقات).
- Save.
جيّد Finance → AR / AP | أقل جودة قسم 1 / قسم 2
4) Designation – المسمّى الوظيفي
ما هو؟ عنوان الوظيفة (مثل: محاسب أول، مسؤول موارد بشرية، مهندس إنتاج) وقد يتكرر عبر أقسام أو فروع مختلفة.
أين يُستخدم؟
- بطاقة الموظف (Employee) وقوالب التقييم والأهداف.
- التوظيف (Job Opening / Job Offer).
- التقارير وتحليل التوزيع الوظيفي.
أفضل ممارسات التسمية
- وحّد الصياغة (Senior Accountant / Accountant I / II).
- تجنب المرادفات المتعددة لنفس الدور (Sales Rep / Sales Executive).
- اربط المسمّى بالدرجة الوظيفية عند الحاجة (انظر Employee Grade).
الخطوات
- من HR → Designation اضغط New.
- أدخل اسم المسمّى وحدد الشركة إن لزم.
- Save.
5) Employee Group – مجموعة الموظفين (لمحة)
ما هي؟ تجميع منطقي لموظفين بسياسات متقاربة (دوام كامل/جزئي/يومي/متدرّب) تستخدم لاحقًا في التقارير أو القواعد.
أين تُفيد؟
- تقسيم التدريب/التواصل الداخلي بحسب نوع المجموعة.
- تقارير مقارنة (دوام كامل مقابل جزئي)، وإعدادات مستقبلية.
الخطوات
- اذهب إلى HR → Employee Group ثم New.
- أدخل اسمًا واضحًا (مثلاً: Full-Time, Part-Time, Contractors).
- Save ثم اربط المجموعة في بطاقة الموظف عند الحاجة.
6) Employee Grade – الدرجة الوظيفية (لمحة)
ما هي؟ مستويات تعكس سلم الرواتب/المزايا (A/B/C أو L1/L2/L3). تُستخدم للتمييز بين باقات التعويضات والامتيازات.
أين تُستخدم؟
- قواعد الرواتب والبدلات (حسب السياسة).
- التقارير وتحليل الكلفة حسب الدرجات.
- سياسات إدارية (سقف موافقات/صلاحيات معينة).
تصميم الدرجات
- اعتمد ترقيمًا/ترميزًا بسيطًا (L1 مبتدئ → L5 مدير).
- اربط كل درجة بإطار مزايا واضح (بدل سكن/نقل/تأمين…).
- حافظ على عدد محدود من الدرجات لتسهيل الإدارة.
الخطوات
- اذهب إلى HR → Employee Grade ثم New.
- أدخل اسم الدرجة (مثال: L3 – Senior).
- Save ثم استخدمها في بطاقة الموظف وقواعد الرواتب/التقارير.
7) HR Settings – شرح تفصيلي (حقل-بحقل)
الأقسام الشائعة: Employee Settings، Payroll Settings، Shift Settings، Leave Settings، Hiring Settings، Mobile Settings.
7.1 Employee Settings
Retirement Age – سن التقاعد
- المعنى: عمر مرجعي للتقاعد (مثال 60/65).
- الضبط: اكتب العمر الرسمي أو اتركه فارغًا.
- الأثر: تقارير/تنبيهات مخصّصة (إن وُجدت).
Employee Records to be created by – أسلوب ترقيم الموظف
- Naming Series: تسلسل تلقائي.
- Employee Number: رقم تُدخِله أنت ويصبح هو معرف السند.
- Full Name: نادر التوصية به لتجنّب تشابه الأسماء.
Stop Birthday Reminders – إيقاف تذكيرات الميلاد
فعّله لبيئات رسمية/تقليل الإشعارات. عطّله لو ثقافة الشركة تشجع التفاعل.
Expense Approver Mandatory In Expense Claim – إلزام معتمد المصاريف
يجعل Expense Approver إجباريًا في Expense Claim؛ مهم عند استخدام Workflow.
7.2 Payroll Settings
Calculate Payroll Working Days Based On
- Leave Application: نموذج بسيط يعتمد الإجازات.
- Attendance: عند ربط الراتب بالبصمة اليومية.
Max working hours against Timesheet
حد أعلى لساعات Timesheet (مثال 12). اتركه 0 إن لم تُستخدم الرواتب بالساعة.
Include holidays in Total no. of Working Days
إدراج العطل ضمن أيام العمل (يقل أجر اليوم). غالبًا نتركه معطّلًا.
Disable Rounded Total
إلغاء التقريب للحفاظ على الفلس/الهللة.
Daily Wages Fraction for Half Day
نسبة أجر نصف اليوم (0.5 شائع، وبعض السياسات 0.75).
Email Salary Slip to Employee
إرسال قسيمة الراتب PDF تلقائيًا عند Submit (تأكد من Preferred Email).
Encrypt Salary Slips in Emails + Password Policy
تشفير القسائم وتحديد صيغة كلمة المرور (مثل SAL-{first_name}-{date_of_birth.year}).
7.3 Shift Settings
Allow Multiple Shift Assignments for Same Date
لشركات التشغيل بشفتين/اليوم. اتركه معطلاً في النمط العادي.
7.4 Leave Settings
Leave Approval Notification Template
قالب إشعار للمُعتمِد (يفضّل قالب عربي/ثنائي).
Leave Status Notification Template
قالب إشعار حالة الطلب للموظف.
Leave Approver Mandatory In Leave Application
إلزام المُعتمِد. استخدم Reports To أو مُعتمِد قسم.
Show Leaves Of All Department Members In Calendar
لأجل التنسيق داخل القسم – مفيد للمدراء.
Auto Leave Encashment
إنشاء مسودات Leave Encashment تلقائيًا عند انتهاء المخصّصات المسموح بها (يرتبط بالرواتب).
Restrict Backdated Leave Application
منع طلبات بأثر رجعي (سماحية أيام محدودة تتطلب تخصيص).
Automatic Allocate Leaves Based On Leave Policy
منح تلقائي للأرصدة حسب Leave Policy Assignment. فعّله بعد ضبط السياسات.
7.5 Hiring Settings
Check Vacancies On Job Offer Creation
يربط Job Offer بخطة التوظيف ويمنع تجاوز السقف.
Send Interview Reminder
تذكير المقابلات للمحكّمين.
Send Interview Feedback Reminder
تذكير بإرسال Feedback بعد المقابلة.
7.6 Mobile Settings
Allow Employee Checkin from Mobile App
تمكين Check-in/Check-out من التطبيق لتوليد Employee Checkin. عطّله عند الاعتماد على بصمة فقط؛ فعّله لفرق ميدانية مع ضوابط موقع (تخصيص).
- Employee: Retirement Age = 60، الترقيم = Employee Number أو Naming Series، إيقاف رسائل الميلاد حسب الثقافة، Expense Approver Mandatory = ✅.
- Payroll: Working Days = Leave Application (أو Attendance ببصمة)، Include Holidays = ❌، Half Day = 0.5، Email Salary Slip = ✅، التشفير = حسب السياسة.
- Shift: Multiple Shifts/Day = ❌ (إلا لو لازِم).
- Leave: قوالب عربية، Approver Mandatory = ✅، عرض إجازات القسم = ✅ للمدراء، Encashment = حسب السياسة، Backdated = ✅ منع/تقييد، Automatic Allocate = ✅ بعد ضبط السياسات.
- Hiring: فعّل التذكيرات لو تستخدم التوظيف.
- Mobile: فعّل لفرق الميدان، عطّل عند الاعتماد على بصمة بموقع ثابت.
8) Employee – بطاقة الموظف (تبويب-تبويب، حقل-بحقل)
الوصول: من البحث Employee أو HR → Employee → Employee ثم New. أدناه شرح لأهم الحقول: معناها، أهميتها، وأين تُستخدم في باقي الموديولات (Payroll, Leaves, Attendance, Recruitment, Performance).

8.1 التبويب الرئيسي (Basic / Employee Details)
9–12) منظومة الإجازات – فهرس تفاعلي (Collapsible)
اختر تبويبًا لعرض التفاصيل الخاصة به. كل تبويب يتوسع ليُظهر الشرح العملي والحقول والتمارين.
9) Leaves – منظومة الإجازات (نظرة شاملة)
تتكوّن المنظومة من: Holiday List، Leave Type، Leave Period، Leave Policy & Assignment، مع مستندات تشغيلية: Leave Allocation وLeave Application، وحالات خاصة مثل Compensatory Leave Request.
- فهم الربط بين السياسات (Policies) والعمليات اليومية (Applications/Allocations).
- تجهيز نموذج عربي شائع (جمعة/سبت أو جمعة) مع سنوية/مرضية/طارئة.

10) Leave Application – طلب الإجازة
الفكرة العامة
مستند Leave Application هو طلب رسمي من الموظف لتخصيم رصيد إجازته ضمن Leave Period محدّد وبنوع إجازة مضبوط داخل Leave Type. يعتمد قبوله على توفر رصيد، ومطابقة التقويم (Holiday List)، وسياسة الموافقات.
الحالة (Workflow) الشائعة
- Draft → يقوم الموظف بإنشاء الطلب.
- Applied/Submitted → يُرسل إلى المعتمد.
- Approved أو Rejected → قرار المعتمد.
- Cancelled → إلغاء بعد الاعتماد (عند الحاجة).
الحقول المهمة
- Employee / Company / Department (يمتلئ بعضها تلقائيًا).
- Leave Type: سنوية/مرضية/طارئة… تحدد خصائص الرصيد والدفع.
- From Date – To Date أو Half Day مع Half Day Date.
- Leave Approver: حسب Reports To أو صلاحيات القسم (قد يكون إلزاميًا حسب إعدادات HR).
- Reason ومرفقات إن لزم.
التحقّقات (Validations) الافتراضية
- لا تعارض تواريخ مع طلبات إجازة أخرى للموظف.
- توفر الرصيد عند Leave Allocation أو وفق Policy المُسندة.
- التعامل مع العطل الأسبوعية والرسمية حسب إعداد النوع (Include Holidays من عدمه).
- الطلبات بأثر رجعي تُمنع أو تُقيّد بحسب Restrict Backdated Leave Application في HR Settings.
خطوات عملية (الموظف)
- افتح Leave Application → New.
- اختر Leave Type وحدّد التواريخ (أو نصف يوم).
- تأكيد Leave Approver وأي ملاحظات.
- Save ثم Submit.
خطوات المعتمد (المدير/الـ HR)
- فتح الطلب من قائمة Leave Application أو من إشعار البريد/الديسك.
- مراجعة الرصيد والتداخلات.
- Approve أو Reject. عند الرفض ضع تعليقًا واضحًا.
- لو نوع الإجازة Unpaid سيظهر أثرها لاحقًا في الرواتب عبر خصم أيام/ساعات.
- لو فعّلت Auto Leave Encashment فستُنشأ مسودات صرف رصيد حسب السياسة عند نهاية الفترة.
- للنوبات/الورديات: راجع توافقها مع Shift Type إن كان هناك ضبط حضور دقيق.

11) Compensatory Leave Request – الإجازة التعويضية
متى نستخدمها؟
عند عمل الموظف في يوم عطلة أو خارج الوقت الطبيعي وفق سياسة الشركة، يمكن منحه إجازة تعويضية بدل أجر إضافي أو معَه. يُستخدم Compensatory Leave Request لإثبات الاستحقاق قبل تقديم Leave Application من نفس النوع.
المتطلبات المسبقة
- نوع إجازة مخصّص أو عام يسمح بالتعويض (مثلاً: Compensatory Off).
- سياسة تُحدّد شروط الاستحقاق (العمل في عطلة رسمية/عطلة أسبوعية، الحد الأدنى للساعات، نافذة الاستخدام… إلخ).
- آلية إثبات: Timesheet أو Attendance أو أمر إداري.
الحقول المهمة
- Employee / Company / Department.
- Work From – Work To (تحديد تاريخ/وقت العمل المُستحَق عنه التعويض).
- Reason و/أو مرجع (Task/Project/Shift) إن لزم.
- Approver (قد يكون مدير المباشر أو HR).
التدفق المقترح
- الموظف يقدّم Compensatory Leave Request بتاريخ العطلة التي عمل فيها.
- المدير يراجع ويعتمد الطلب؛ قد يحدّد رصيدًا/يومًا أو يُنشئ قيدًا يتيح للموظف التقديم لاحقًا على Leave Application.
- الموظف يقدّم Leave Application من نوع Comp Off ضمن النافذة الزمنية المسموحة.
- ثبّت سياسة واضحة لمدة صلاحية التعويض (مثلاً: يجب استخدامه خلال 90 يومًا من تاريخ الاستحقاق).
- طابق العطلة مع Holiday List للتأكد أنها كانت يوم عطلة فعلاً.
- إن استُخدمت Attendance أو Employee Checkin، احرص على دقة أوقات الدخول/الخروج لذلك اليوم.
12) Next: Holiday/Types/Period/Policy – الخطوات التالية
الخريطة الذهبية لإكمال إعداد منظومة الإجازات
- Holiday List: أنشئ قائمة العطل الرسمية/الأسبوعية (مثال: جمعة/سبت).
- Leave Type:
- حدّد Paid/Unpaid، وسمات مثل Allow Accumulation / Carry Forward / Include Holidays.
- للتعويض: أنشئ نوعًا خاصًا مثل Comp Off، واضبط سياسته.
- Leave Period: عرّف الفترة السنوية (مثلاً: 01-01 → 31-12) واربطها بالشركة.
- Leave Policy: عيّن حصص كل نوع (سنوية/مرضية/طارئة…)، وترحيل الأرصدة إن لزم.
- Leave Policy Assignment: اسند السياسة للموظفين/المجموعات (حسب Employee Group أو Grade).
- Automatic Allocate (اختياري): فعّله من HR Settings ليُمنح الرصيد تلقائيًا مع بداية Leave Period.
- الاختبار:
- أنشئ حساب موظف تجريبي.
- تحقّق من رصيد الأنواع المختلفة.
- قدّم طلبات (سنوية/مرضية/نصف يوم/تعويضية) وتأكد من سلوك الموافقات والرصيد.
13) Attendance Suite – الحضور والغياب
تشمل إدارة الحضور في ERPNext ثلاثة مكوّنات رئيسية: Attendance، Attendance Request، وEmployee Checkin…
13.1 Attendance – سجل الحضور

13.2 Attendance Request – طلب حضور
13.3 Employee Checkin – تسجيل الدخول/الخروج

14) Expense Claims Suite – المصاريف والسُلف والسفر
تغطي هذه المجموعة: Expense Claim، Employee Advance، وTravel Request…
14.1 Expense Claim – مطالبة مصاريف

14.2 Employee Advance – سلفة موظف

14.3 Travel Request – طلب سفر
15) HR Communication – Daily Work Summary Group & Team Updates
أدوات خفيفة لتجميع ملخصات العمل اليومية وتحديثات الفريق داخل HR، تُفيد للمتابعة السريعة دون الحاجة لنظام مهام كامل.
15.1 Daily Work Summary Group (DWSG) – ملخّصات العمل اليومية
الفكرة
يجمع يوميًا رسائل قصيرة من الموظفين عن إنجازاتهم/عوائقهم ويرسلها لمسؤولين محددين (HR/المدير المباشر).
الحالات الشائعة
- متابعة فرق المبيعات الميدانية أو موظفي الاستقبال.
- تلخيص إنجازات قسم HR نفسه (التوظيف/المقابلات/المتابعات).
الحقول المهمة
- Group Name – اسم المجموعة (مثلاً: HR-Daily).
- Users – المستخدمون المُلزَمون بإرسال الملخص.
- Notify By – بريد/نظام/كلاهما (حسب سياسة الاتصال).
- Send Summary To – قائمة مستلمين (مدير/HR/قيادة).
- Summary Type – يومي/أسبوعي (الأكثر شيوعًا: يومي).
خطوات الإعداد
- افتح Daily Work Summary Group → New.
- أدخل الاسم وأضف Users وSend Summary To.
- حدّد آلية الإشعار (Email/System) والتواتر.
- Save، ثم اختبر بإرسال ملخص تجريبي.
- نماذج جاهزة: عرّف قالبًا مختصرًا (3 أسئلة: ماذا أنجزت؟ ماذا ستنجز غدًا؟ عوائق؟).
- التذكير الآلي: استعمل إشعارًا عند عدم إرسال الملخّص حتى ساعة محددة.
- التقارير: راجع تقرير Daily Work Summary Replies أسبوعيًا.
15.2 Team Updates – تحديثات الفريق
الفكرة
قناة خفيفة لإرسال تحديثات دورية (إعلانات HR، سياسات جديدة، مواعيد تدريب، تغييرات عطَل) إلى مجموعة موظفين.
الاستخدام
- نشر تبديلات Holiday List أو تغييرات ساعات العمل.
- تذكير بمواعيد تسليم Expense Claims أو وثائق الموظف.
خطوات سريعة
- أنشئ Email Group أو استخدم Newsletter داخلي.
- فلترة المستلمين بالفرع/القسم/الدرجة (Export من تقرير الموظفين ثم استيراد للقائمة إن لزم).
- استخدم قالب ثنائي اللغة (عربي/إنجليزي) لسهولة الفهم.
16) Key Reports – تقارير أساسية
هذه التقارير تُستخدم يوميًا/شهريًا لاتخاذ القرار وتشغيل HR بكفاءة.
16.1 Attendance & Leaves – الحضور والإجازات
- Monthly Attendance Sheet: شبكة الحضور شهريًا لكل موظف (فلترة بالفرع/القسم/الشيفت).
- Employee Leave Balance: أرصدة الإجازات حسب النوع (Carry Forward/Consumed/Remaining).
- Leave Application (Report): حالات الطلبات (Pending/Approved/Rejected) مع التواريخ.
16.2 Payroll – الرواتب
- Salary Register: إجماليات الراتب، البدلات، الاستقطاعات، الصافي (حسب الشهر والشركة).
- Salary Slip (Report): تفاصيل كل قسيمة (فلترة بالفرع/القسم/الدرجة).
- Working Days Summary: أساس احتساب أيام/ساعات العمل (Attendance/Leave Application).
16.3 Claims & Advances – المصاريف والسلف
- Expense Claim Summary: حالة المطالبات، القيم حسب النوع والمشروع/القسم.
- Employee Advance Summary: السلف المفتوحة، المسدّد، الرصيد المتبقي.
16.4 Recruitment & Performance – التوظيف والأداء
- Job Applicant (Report): مسار المرشّحين حسب المرحلة والمصدر.
- Appraisal (Report): تقييمات الأداء، الدرجات، الأهداف.
- احفظ Filters شائعة الاستخدام كـ Saved Filters لكل تقرير.
- صدّر إلى Excel وأرسل إلى الإدارة شهريًا عبر Auto Email Report.
- استخدم User Permission لتقييد رؤية التقارير حسب الفرع/القسم.
17) Other Reports – تقارير إضافية
17.1 People & Directory – الأشخاص والدليل
- Employee Information: بيانات أساسية (الشركة/الفرع/القسم/المسمّى/المدير).
- Employee Birthday: مواليد الشهر/الأسبوع (للتواصل أو التهنئة).
- Employee Separation: منتهو الخدمة/المغادرون قريبًا.
17.2 Attendance & Shift – الحضور والنوبات
- Employee Checkin (Report): سجلات دخول/خروج مع الزمن والموقع (إن وُجد).
- Shift Assignment: المكلّفون بالشفتات وفتراتها.
- Employees Working on a Holiday: من عمل خلال عطلة (للتعويض أو الأجر الإضافي).
17.3 Communication & Summaries – الاتصالات والملخّصات
- Daily Work Summary Replies: استجابات الموظفين للملخص اليومي (من أجاب/من لم يجب).
- Team Updates Log (إن وُجِد كتخصيص): أرشيف الرسائل/النشرات الداخلية.
17.4 Leaves – الإجازات (تفصيلي)
- Leave Allocation: المخصّصات الممنوحة (بالنوع والفترة).
- Leave Encashment: صرف الأرصدة (مسودات/معتمدة).
- Leave Ledger (إن متاح): حركة الأرصدة تفصيليًا (Credits/Debits).
2. Recruitment and employee lifecycle
1) Overview EN1) What You Will Learn (Recruitment Overview)
We will cover the core masters and reports related to recruitment in a practical sequence: Staffing Plan → Job Requisition → Job Opening → Job Applicant → Interview (with Interview Type / Round / Feedback) → Job Offer → Appointment Letter. We will also touch on Employee Referral and Recruitment Analytics.
- Convert annual or quarterly hiring plans into actual job openings linked to departments, branches, and grades.
- Manage the candidate pipeline (classification, filtering, interview rounds, evaluations) with reminders and notifications.
- Issue job offers and convert accepted candidates into Employees while keeping HR modules aligned.

2) Staffing Plan
Meaning & Use
A plan that defines headcount requirements for each Department/Branch over a specific period (year / quarter / month). It acts as a reference to control vacancy limits and allows the system to automatically validate capacity when creating a Job Offer if Check Vacancies is enabled in recruitment settings.
Where It Is Used
- Setting the number of openings per Designation and Grade for a defined period.
- Reports like Planned vs. Hired to see shortages or excess staffing.
Steps to Create
- Go to HR → Recruitment → Staffing Plan and click New.
- Select Company and Period, then add rows (Department / Designation / Vacancies / Grade).
- Save then Submit.
3) Job Requisition – Internal Hiring Request
Meaning & Use
A formal request raised by the department manager to open a position. It includes justification, budget, employment type, and required skills and may be linked to a Staffing Plan to validate available headcount automatically.
Key Fields
- Department / Branch / Company
- Designation and Employment Type (Full-time / Part-time / Intern…)
- Requested Vacancies, Budget, Job Description
- Attachments such as JD, responsibilities, and required certifications
Steps
- HR → Recruitment → Job Requisition → New.
- Fill in the data and submit it for approval using the Workflow.
- Once approved, create a Job Opening directly from the requisition.
4) Job Opening
Meaning & Use
The record that defines the actual vacancy that will receive applicants. It can be published to the portal/website, with number of vacancies, location, job description, and can be linked back to a Job Requisition.
Key Fields
- Designation / Department / Branch
- Vacancies and Expected CTC (optional)
- Publish to portal/website (short description plus requirements)
Workflow
- Create the Job Opening and link it to the relevant Job Requisition if any.
- Start receiving Job Applicants either automatically (Portal) or manually (HR).
5) Job Applicant – Candidate
Meaning & Use
The candidate record with contact information, CV, and pipeline status (Applied → Shortlisted → Interview → Offered → Joined/Rejected). It makes it easy to assign owners, capture notes, and manage evaluations.
Key Fields
- Applicant Name / Email / Phone
- Linked Job Opening
- Resume Attachment / Portfolio
- Status + Next Steps + Comments / Tags

Best Practices
- Keep Status updated and use Assignment and Kanban views where available.
- Use Tags (Python, Senior, Remote…) for quick search and better reporting.
6) Interviews (Type / Round / Interview / Feedback)
Structure & Components
Interview Type
Defines generic interview types (Technical, HR, Managerial, etc.) and acts as a base for expected evaluation criteria.
Interview Round
Represents a stage in the pipeline (Round 1 – Screening, Round 2 – Technical, …) with assigned interviewers and reminders.
Interview
Schedules an interview (date, time, interviewers, candidate). It can send invitations and calendar events when reminders are enabled.
Interview Feedback
A structured feedback form after the interview (scores, comments, recommendation) which can be mandatory before moving to the offer stage.


7) Job Offer
Meaning & Use
The formal document sent to the selected candidate including title, grade, compensation package, joining date, and conditions. It can be validated against the Staffing Plan to ensure headcount limits.
Core Fields
- Applicant and Designation (+ Grade if required)
- Proposed CTC / Salary Structure plus allowances
- Offer Terms, Expiry Date, Date of Joining
Next Steps
- Send the offer to the candidate (PDF or Portal).
- Once accepted, create an Appointment Letter and later the Employee record.
8) Appointment – Appointment Letters
Appointment Letter Template / Appointment Letter
Templates and final appointment letters. After signing, you can create the Employee record automatically (or manually) and link it to the correct (Company / Branch / Department / Designation) and prepare payroll and attendance setup.
Best Practices
- Use bilingual templates (Arabic/English) if required by law or policy.
- Align financial terms with Salary Structure and Salary Structure Assignment to avoid double entry.
9) Employee Referral
Meaning & Use
A mechanism to register internal referrals submitted by current employees, track their status, and manage referral bonuses (if your policy includes them). A referral can be converted into a Job Applicant and then follow the standard hiring pipeline.
10) Reports
Recruitment Analytics & Key Metrics
- Recruitment Analytics: Candidate sources, time-to-hire, offers sent/accepted, and conversion rates across stages.
- Interview-related reports: number of scheduled interviews, punctuality, time to close openings, and bottlenecks in the process.
11) Training Session Plan
From Idea to Hiring
- Configure the Staffing Plan and explain internal recruitment policies.
- Simulate Job Requisition → Job Opening with practical examples.
- Enter a candidate as Job Applicant and walk through the Interview flow (Type / Round / Feedback).
- Issue a Job Offer and create an Appointment Letter.
- Convert the accepted candidate into an Employee and link them to other HR modules.
12) Employee Lifecycle Suite
Onboarding – First Steps for New Hires
Employee Onboarding Template
A task template that defines onboarding steps (accounts, equipment, line manager, initial training, etc.).
Employee Onboarding
The actual execution of the template for a specific employee with status tracking, owners, and due dates.
Employee Skill Map
A skills map to identify gaps and design training plans and future promotions.
Quick Steps
- Create Employee Onboarding Template for each department/group.
- Create Employee Onboarding and link it to the employee and template.
- Track completion through the task list and reminders.
Grievance – Employee Complaints
Grievance Type
Complaint categories (behavioral, administrative, safety, etc.).
Employee Grievance
Records the complaint, investigation steps, and outcome, with links to disciplinary actions or training if needed.
Training
Training Program
Defines the program (objectives, content, target audience).
Training Event
A specific training session (date, venue/platform, trainer, attendance).
Training Feedback / Result
Feedback surveys and pass/fail results.
Suggested Flow
- Create a Training Program then its Training Event.
- Add participants and track attendance.
- Collect Training Feedback and record Training Result.
Daily Work Summary
Daily Work Summary / Group / Replies: A lightweight mechanism for gathering daily team updates. Group defines who receives the reminder and Replies are team members’ responses.
Reports
- Employee Exits: Track leavers and offboarding steps.
- Employee Birthday / Information / Analytics: Employee info cards and general dashboards.
3. Payroll / Salary Payout / Tax & Benefits
1) Overview1) Overview of the Payroll Cycle
The purpose of the Payroll module is to calculate and pay employees’ wages accurately and track all accounting and tax implications. The cycle usually starts with master data setup (salary components, salary structures, payroll periods, income tax slabs), then assigning salary structures to employees, and afterwards creating the Payroll Entry that generates Salary Slips, posts GL entries, and handles payment. Any additional allowances/deductions are recorded using Additional Salary or Employee Incentive, while withheld amounts are managed throughout Salary Withholding. Taxes and exemptions are configured from the Tax & Benefits workspace.
- Define Company / Branch / Department and link employees to them.
- Finalize the Chart of Accounts and payroll-related accounts (salary expense, provisions, payables).
- Set the currency and the payroll calendar in Payroll Period.
2) Core Masters
2.1 Salary Component
Defines each element that affects the salary such as: Basic, Housing Allowance, Transport Allowance, Absence Deduction, etc. Each component has a type (Earning / Deduction), formula, and linked account. The idea is to control calculation logic and account mapping so that the component can be reused inside the Salary Structure.


- Go to Payroll → Salary Component and click New.
- Set the type (Earning/Deduction), account, and calculation method (fixed amount, percentage, expression).
- If needed, enable Do not include in total for informational components.
2.2 Salary Structure
A template grouping multiple components and rules for a group of employees (for example, “Monthly – Admin”). It uses the previously defined components and specifies how they apply to an employee. The purpose is to standardize the policy and link it to employees so salary slips can be created automatically.
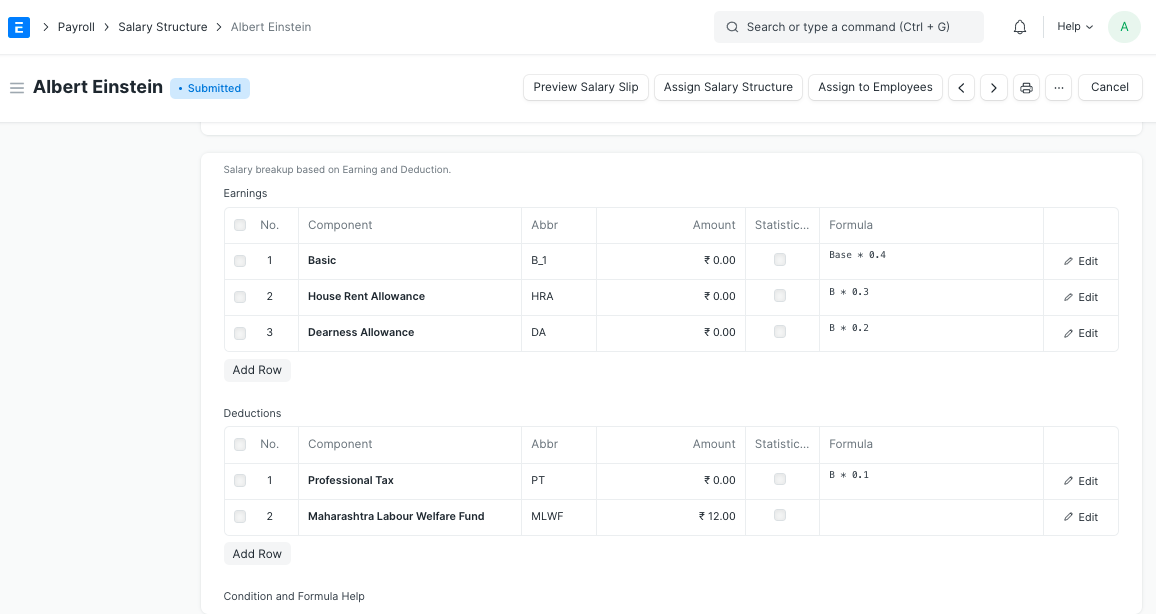
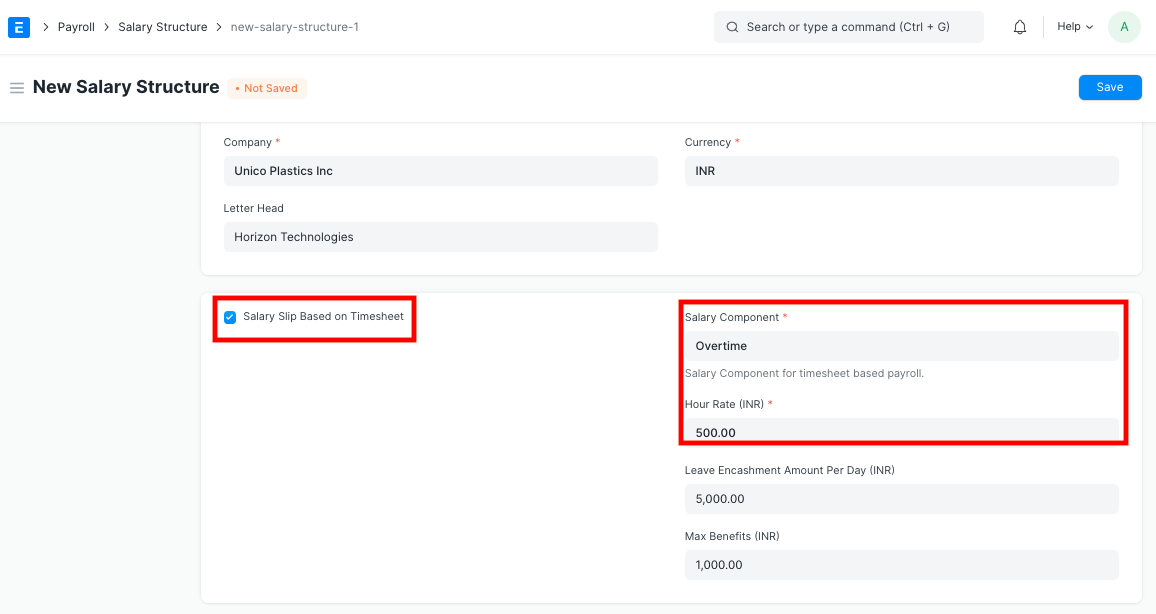
- Payroll → Salary Structure → New.
- Select Pay Frequency (Monthly/Weekly) and add components with values/formulas.
- Save the structure and use it in Salary Structure Assignment.
2.3 Salary Structure Assignment
Links an employee to a specific Salary Structure and sets the effective date and any variable component values. This tells the system which structure to apply when generating salary slips for that employee.
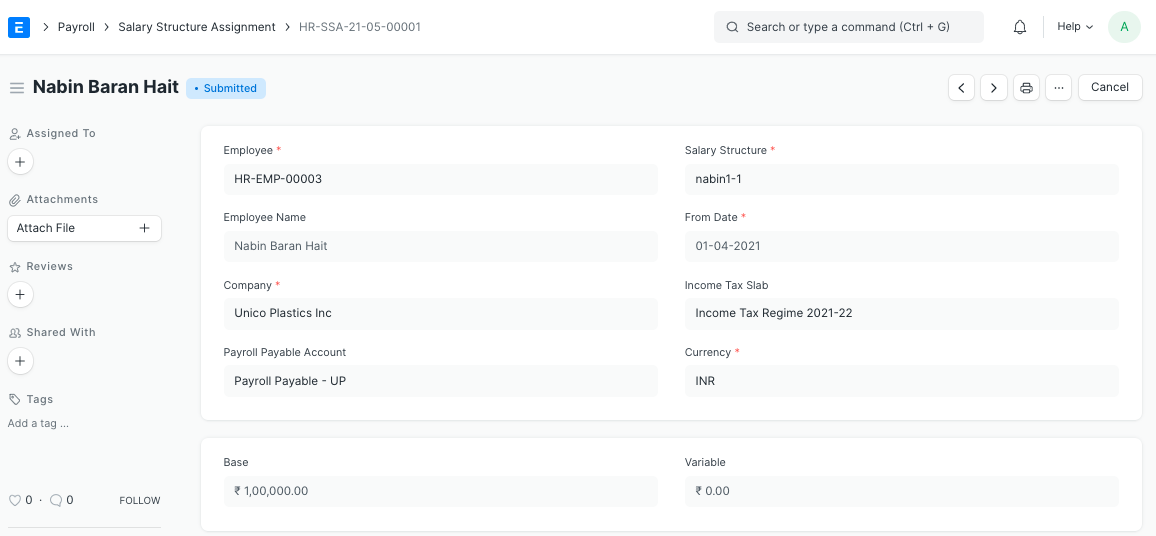
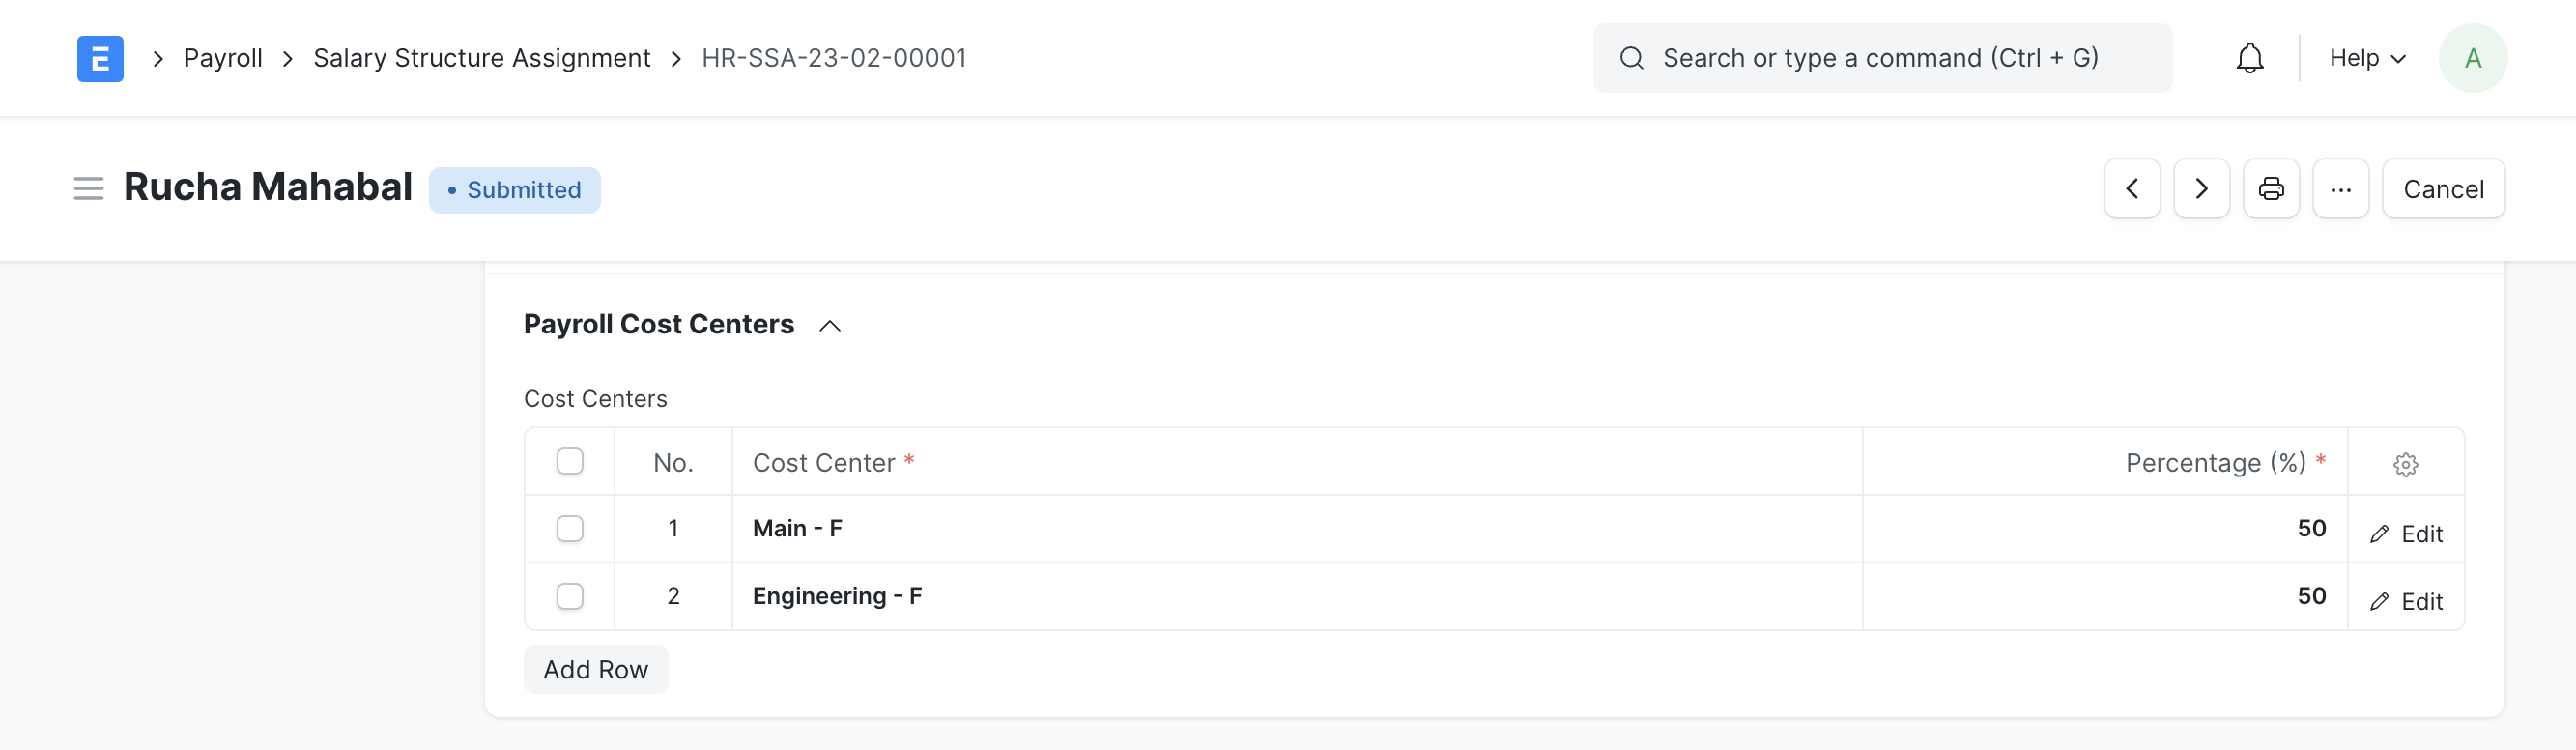
- Payroll → Salary Structure Assignment → New.
- Select the employee, structure, start date, and adjust component values if needed.
- Save/Submit. (For mass assignment, use Bulk Salary Structure Assignment.)
2.4 Payroll Period
Defines the start and end of the fiscal/payroll period in which payroll entries and tax computations are created. The purpose is to unify reporting ranges and align them with the tax calendar.
- Payroll → Payroll Period → New.
- Select Company, Start/End Date, and link a Holiday List if required.
2.5 Income Tax Slab
Defines tax slabs, rates, and exempt thresholds, and whether the calculation is yearly or monthly. It is used in Income Tax Computation and inside salary slips when tax calculation is enabled.
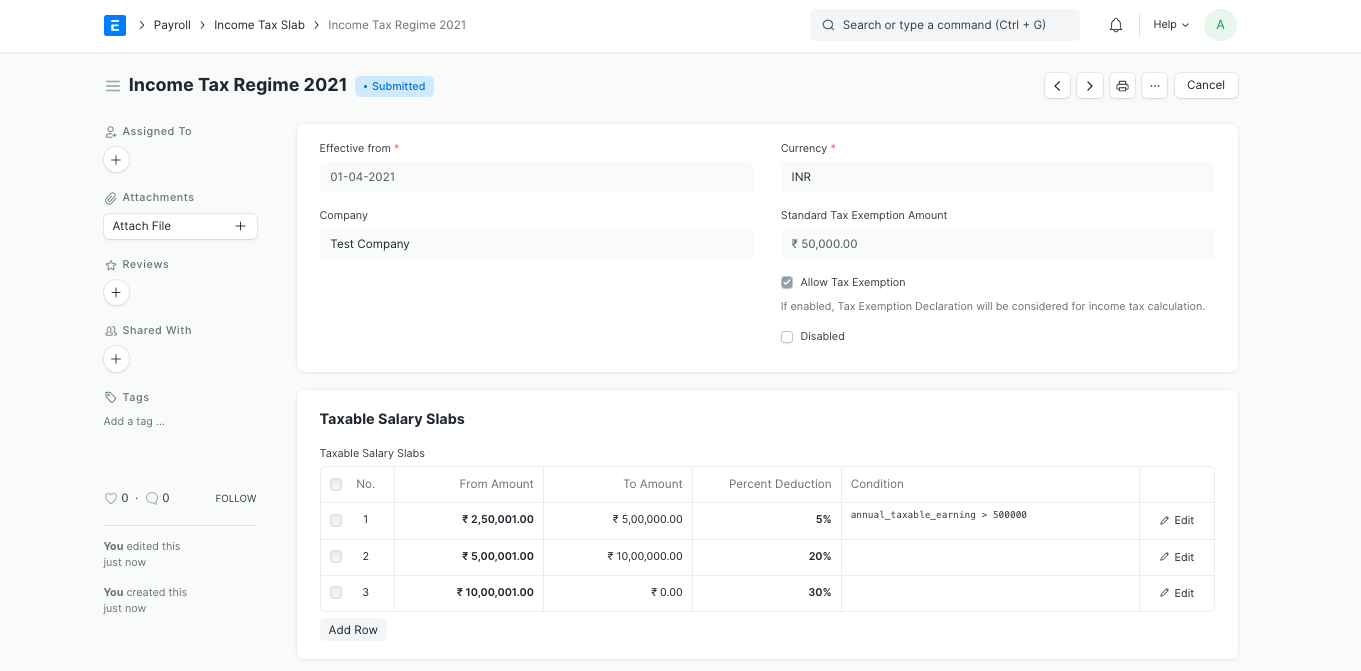

- Tax & Benefits → Income Tax Slab → New.
- Add the slabs (From–To), rate, and fixed/exempt amounts.
3) Running Payroll (Payroll Entry & Slips)
3.1 Additional Salary / Incentives / Withholding
Use these documents to record any items outside the base structure such as bonuses, penalties, or withheld amounts. Additional Salary adds a single earning/deduction for a specific employee and period. Employee Incentive manages incentive schemes which can be applied to multiple employees. Salary Withholding is used to temporarily withhold part of the net salary until a release date.
- Create an Additional Salary and specify type (Earning/Deduction), amount, and period.
- For group incentives, use Employee Incentive.
- For temporary holds, create Salary Withholding with reason and end date.
3.2 Payroll Entry – Generate & Post
The central document that creates Salary Slips for all selected employees within a company/branch/department for a specific period, then submits them, posts GL entries, and coordinates payment. The goal is to automate the entire payroll run.
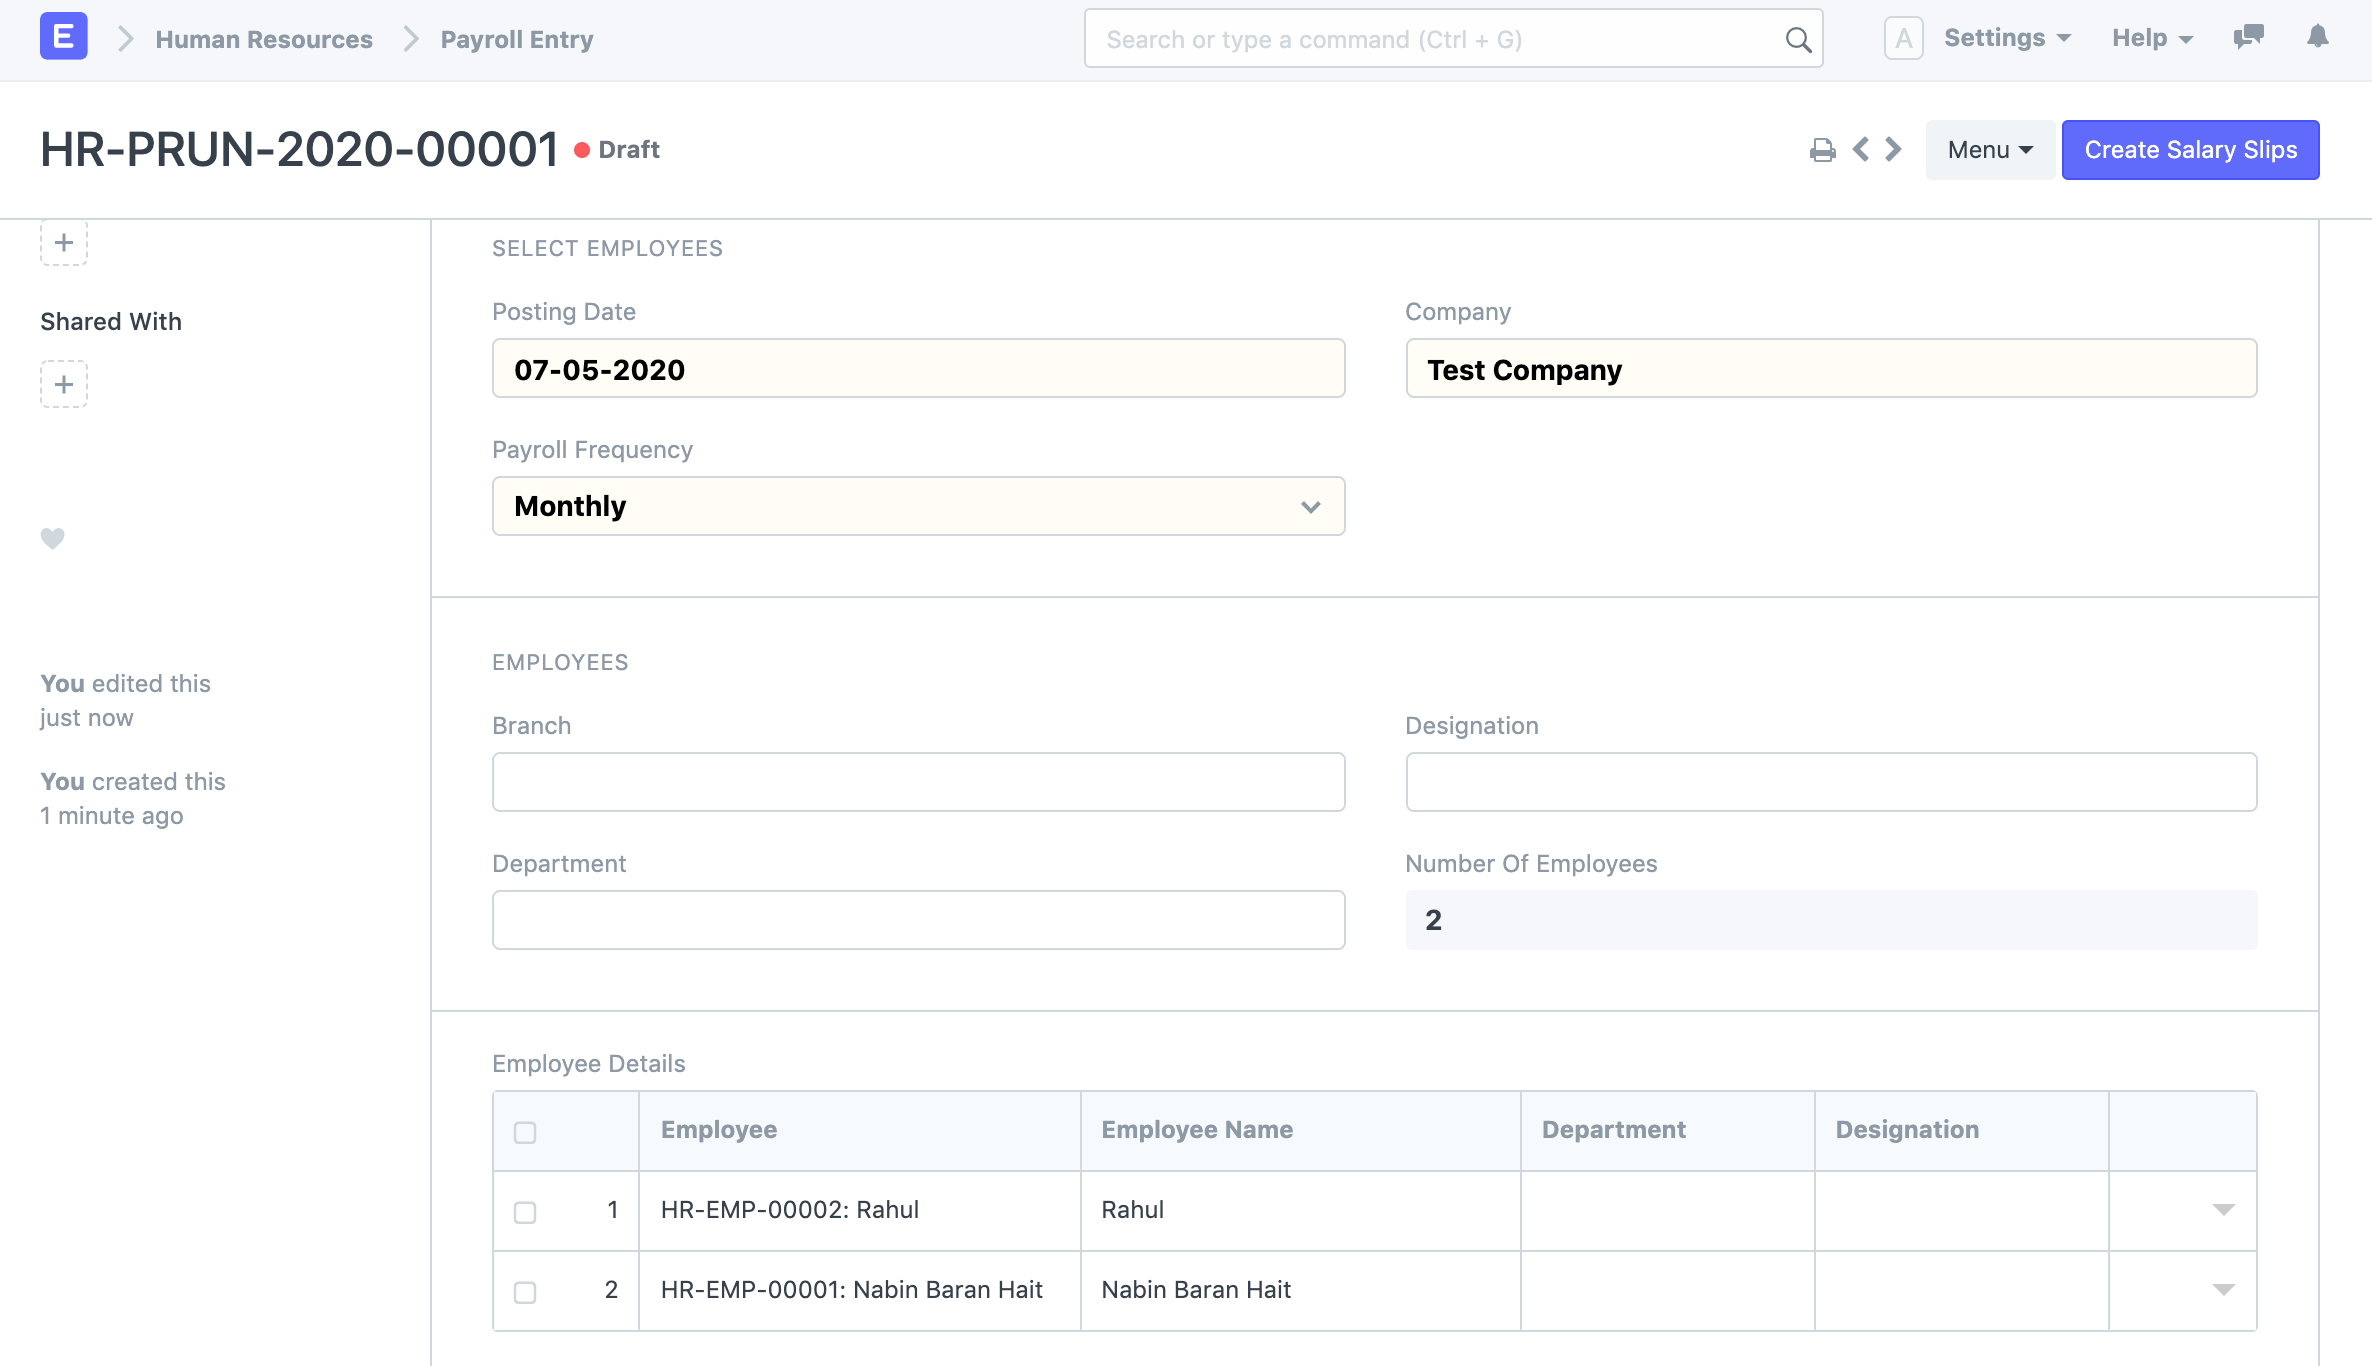
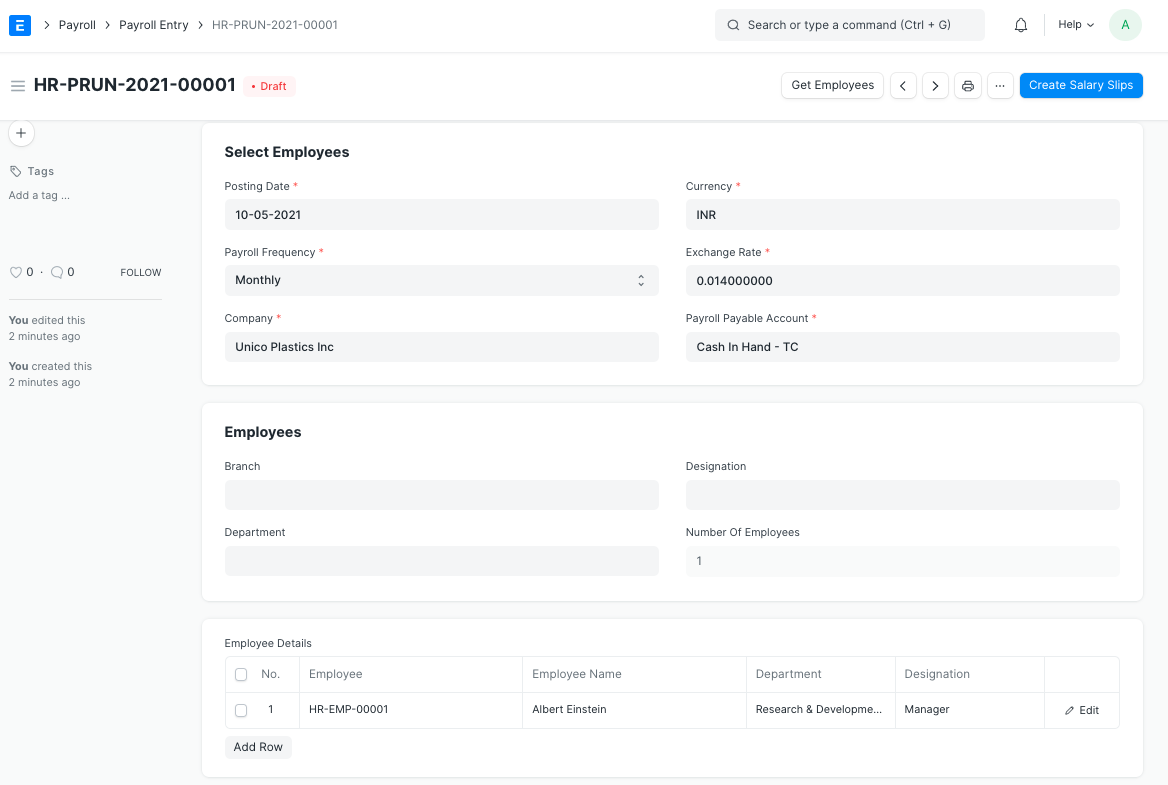
- Payroll → Payroll Entry → set company, date range, and filters.
- Click Get Employees and review the list.
- Run Create Salary Slips then Submit Salary Slip (individually or in bulk).
- Submit Payroll Entry to auto-create GL entries.
- Optionally: Create Bank Entry / Payment Entries for bank/cash payments.
3.3 Salary Slip
Represents the detailed pay for one employee and one pay period. Components are pulled from the structure, assignments, additional salary documents, and tax configuration. The slip is submitted and posted automatically through the Payroll Entry or manually, if needed.
- Verify attendance/leaves if the structure uses them in calculations.
- Review net pay, currency, and all deductions before submission.
4) Salary Payout Workspace – Execution & Reports
The “Salary Payout” workspace groups the most frequently used links: Salary Slip, Payroll Entry, Bulk Salary Structure Assignment, and payment-related reports such as Salary Register, Bank Remittance, Salary Payments Based On Payment Mode, and Salary Payments via ECS. The aim is to complete and review salary payments quickly from one place.
4.1 Core Payout Reports
- Salary Register: Consolidated register per employee/period with all components and net pay.
- Bank Remittance: File/list for bank transfers grouped by account or payment mode.
- Payments Based on Mode: Analysis by payment method (transfer, cash, cheque, etc.).
- Payments via ECS: Generate or track ECS files where supported by the bank.
5) Taxes and Benefits – Tax & Benefits
This workspace is used to configure tax rules and manage employee exemptions and benefits. The idea is that employees submit Declarations and upload Proof Submissions, and their effect appears in the Income Tax Computation and is reflected in the salary slip.
5.1 Tax Setup
- Income Tax Slab: Define tax slabs as described earlier.
- Employee Tax Exemption Category / Sub Category: Classify exemption types (education, insurance, housing, etc.) with their limits.
5.2 Exemptions – Declarations and Proof
- Employee Tax Exemption Declaration: Employee declares the items they plan to claim during the year.
- Employee Tax Exemption Proof Submission: Employee uploads supporting documents for verification prior to finalization.
5.3 Benefits
- Employee Benefit Application: Employee applies for a benefit (medical insurance, equipment allowance, etc.).
- Employee Benefit Claim: Settlement of claims linked to an approved benefit.
5.4 Tax Reports
- Income Tax Computation: Calculates tax per employee according to slabs and exemptions.
- Income Tax Deductions: Summary of the actual tax amounts deducted through salary slips.
6) Accounting Integration (Accounts & Entries)
When a Payroll Entry is submitted, ERPNext automatically generates the required GL Entries: debits to expense accounts and credits to liability accounts (salary payable, tax payable, etc.). These liabilities are then settled through Payment Entry or Bank Entry. Make sure the Accounts Settings and each component’s accounts are configured correctly.
- Salary Expense (P&L) – for positive earnings and allowances.
- Salary/Tax Payable (B/S) – for net salary and statutory deductions.
- Benefit or Withholding accounts – according to your company policy.
7) Common Troubleshooting Scenarios
- Unexpected net pay: Check Additional Salary, Withholding, and attendance/leaves.
- Failed slip creation: Ensure there is an active Salary Structure Assignment covering the selected period.
- GL mismatches: Review component accounts, company currency, and posting dates.
- Zero tax: Verify Income Tax Slab, Payroll Period, and employee exemption configuration.
8) Suggested Training Session Plan
- Build Salary Components and a Salary Structure for a demo scenario.
- Assign the structure via SSA to a group of employees (one with fixed components, one with variable components).
- Create Additional Salary (bonus/deduction) and Withholding for a sample employee.
- Run a full Payroll Entry: create slips → submit → post GL → process payment.
- Review reports: Salary Register / Bank Remittance / Income Tax Computation.
11. HR master data before go-live
Before entering employees or running payroll, the organization structure should be configured: Company, Branch, Department, Designation, Employee Grade, Employee Group, and Holiday List.
- Define company and branches.
- Define departments and designations.
- Define grades and employee groups when needed.
- Create Holiday Lists.
- Create Employee records only after the structure is stable.
12. Employee Master
Employee Master is the center of HR data. Payroll, attendance, leaves, loans, expenses, recruitment, and reports depend on accurate employee records.
- Joining date, branch, department, designation, and status.
- Salary Structure Assignment and payment details.
- Shift, Holiday List, and Leave Policy.
- Legal or local fields required by the company.
13. Recruitment from planning to job offer
ERPNext HRMS can manage recruitment through Staffing Plan, Job Requisition, Job Opening, Job Applicant, Interviews, Feedback, and Job Offer.
14. Employee Lifecycle
After hiring, the employee lifecycle may include onboarding, training, evaluation, transfer, promotion, grievance, and separation.
15. Salary Component and Salary Structure
Payroll starts with Salary Components such as basic salary, allowances, deductions, taxes, benefits, and loans. Salary Structure combines these components into a payroll template for employees.
16. Payroll Entry and Salary Slip
Payroll Entry runs payroll for a period, fetches eligible employees, creates Salary Slips, and can post accounting entries depending on configuration.
- Select company, payroll period, and frequency.
- Choose the date range.
- Fetch employees.
- Create and review Salary Slips.
- Submit payroll and accounting entries after review.
17. Salary Payout
After payroll submission, the company must execute payment and track paid and unpaid salary amounts according to bank or cash procedures.
18. Payroll accounting, taxes, and benefits
Payroll has a direct accounting impact. Salary components should be linked to the right expense, liability, tax, benefit, and advance accounts where needed.
Course summary for search and AI discovery
A practical ERPNext HRMS and Payroll course covering HR setup, employee master, recruitment, employee lifecycle, payroll run, salary payout, and accounting integration.
Topics and keywords
- ERPNext HRMS
- ERPNext Payroll
- Payroll Entry ERPNext
- Salary Slip ERPNext
- Salary Structure ERPNext
- Salary Payout ERPNext
- Recruitment ERPNext
- Employee Lifecycle ERPNext
- HRMS ERPNext Jordan
- NextFuture ERPNext Training